Have you been dealing with a persistent cough, sneezing, or allergy-like symptoms that just won’t quit? Before you blame pollen, you might want to look closer at your home. Mold isn’t just an unsightly nuisance; it releases spores into the air that can impact your family’s health and your home’s air quality. Ignoring a musty smell or a small water stain can allow a hidden problem to grow. Taking care of your home means taking care of the air you breathe, and that’s where professional mold remediation comes in. Ahead, we’ll cover the health risks of mold exposure and explain how to restore your home to a safe, healthy environment.
Key Takeaways
- Fix the Water Problem First: Simply cleaning visible mold won’t solve the issue if the underlying moisture source remains. Lasting mold control starts with repairing leaks, improving ventilation, and managing humidity to make your home inhospitable to growth.
- Know Your DIY Limits for Safety: Tackling mold yourself is only safe for small, contained areas (less than 10 sq. ft.). For larger problems or hidden mold, professional remediation is essential to prevent cross-contamination and protect your family’s health.
- Stay Vigilant with Simple Routines: Preventing mold’s return is about consistent, simple habits. Regularly check for leaks under sinks, use exhaust fans in bathrooms and kitchens, and keep indoor humidity low to maintain a dry, healthy home environment.
What is Mold and Why is it a Problem?
Finding mold in your home can be unsettling. It’s one of those problems that feels like it appears out of nowhere, and it’s often misunderstood. Mold is a type of fungus that exists everywhere, both indoors and outdoors. It plays a vital role in nature by breaking down dead organic matter, but when it starts growing inside your home, it can become a serious issue. Mold thrives on moisture and can grow on virtually any surface, from wood and drywall to carpet and insulation. In a humid climate like Palm Beach County, managing indoor moisture is key to preventing mold from taking hold. When mold finds a damp spot in your home, it can spread quickly, potentially damaging your property and affecting your family’s health.
What Does “Mold Remediation” Mean?
You might hear the terms “mold removal” and “mold remediation” used interchangeably, but they aren’t quite the same. Remediation is a more comprehensive process. It involves not only removing the mold but also identifying and fixing the source of the moisture that allowed it to grow in the first place. According to the American Lung Association, indoor environments are prone to moisture problems that can lead to mold. Simply scrubbing the visible mold away won’t solve the underlying issue. True remediation includes containing the affected area to prevent cross-contamination, cleaning and sanitizing the surfaces, and taking steps to ensure the mold doesn’t return. It’s a systematic approach to restore your home to a safe and healthy condition.
Common Molds Found in Homes
While there are thousands of types of mold, a few are particularly common in households. You might encounter varieties like Cladosporium, Penicillium, and Aspergillus. These can appear as black, green, or white patches and often grow in damp, dark places like bathrooms, basements, and kitchens. The National Institute of Environmental Health Sciences explains that mold is a microorganism that thrives in wet places. You don’t need to be a mycologist to know you have a problem; if you see discoloration on your walls or smell a musty odor, it’s a good sign that one of these common molds has made itself at home. The key is to act quickly, regardless of the specific type you think it might be.
The Health Risks of Mold Exposure
Beyond the damage to your property, mold can pose a significant health risk. For some people, mold exposure can trigger allergic reactions, with symptoms like sneezing, a runny nose, red eyes, and skin rashes. For individuals with asthma or other respiratory conditions, it can be even more serious, potentially leading to breathing difficulties. WebMD notes that mold growing in your home can be a health hazard, especially for those with compromised immune systems. Even if you don’t have pre-existing conditions, long-term exposure isn’t good for anyone. Taking care of a mold problem is an important step in protecting the health and well-being of everyone under your roof.
Mold Myths vs. Facts
There’s a lot of misinformation out there about mold, which can cause unnecessary panic. One of the biggest myths is that all black mold is “toxic.” While certain types of mold can produce mycotoxins, most are not toxic. The color of the mold doesn’t necessarily indicate how dangerous it is. Another common misconception is that a home can be completely mold-free. The truth is, mold spores are a natural part of our environment and are always present in the air. The problem arises when these spores land on a wet surface and begin to multiply, leading to high concentrations. A clean, dry home will have some mold spores, but not enough to cause issues.
Do You Need Professional Mold Remediation?
It’s easy to feel a little panicked when you spot something that looks like mold in your home. Your first thought might be to grab some bleach and scrub it away, but that’s not always the best or safest solution. While some tiny spots of mildew in the shower can be handled on your own, more significant mold problems require a professional touch. The key is knowing how to tell the difference.
Figuring out your next steps starts with a little detective work. You need to look for both the obvious and the hidden signs of mold, pay attention to how you and your family are feeling, and understand when a problem is too big to handle yourself. In a humid climate like ours here in Palm Beach County, staying vigilant is especially important. Let’s walk through what you need to know to decide if it’s time to call in the experts for a proper mold remediation.
Visible and Hidden Signs of Mold
Sometimes, mold makes itself obvious. You might see fuzzy black, green, or white spots growing on your walls, ceilings, or around your windows. But often, the signs are much more subtle. One of the most common clues is a persistent musty or earthy smell that you can’t seem to trace. If an area of your home smells damp even when it’s dry, you could have mold growing behind the drywall or under the floorboards. You should also keep an eye out for signs of water damage, as mold loves moisture. Look for warping, peeling, or discolored paint or wallpaper, which often indicates a hidden leak—and a potential breeding ground for mold.
Health Symptoms Linked to Mold
Have you been dealing with allergy-like symptoms that just won’t go away? It might not be pollen. When mold grows, it releases spores into the air that can act as allergens and irritants, causing a range of health issues for some people, especially with prolonged exposure. Common reactions include sneezing, a runny or stuffy nose, itchy eyes, and skin rashes. If you or someone in your family has asthma, mold can trigger attacks and make breathing difficult. If you’re feeling consistently unwell at home but better when you’re out, it’s a good idea to consider if mold could be the culprit.
Know When to Call an Expert
While it’s tempting to tackle mold yourself, some situations absolutely require a professional. A good rule of thumb is to call for help if the affected area is larger than 10 square feet. You should also bring in an expert if you suspect mold is hidden inside your walls or your HVAC system, as these areas are impossible to clean properly without specialized equipment. Most importantly, if anyone in your home has asthma, allergies, or a compromised immune system, don’t take any chances. A professional mold remediation team has the training and safety gear to remove the mold safely without putting your family’s health at risk.
How to Assess Your Risk
The best way to deal with mold is to prevent it from growing in the first place. Since mold needs moisture to thrive, managing water and humidity in your home is crucial. Start by fixing any water leaks right away, no matter how small they seem. Think twice before putting carpet in humid areas like bathrooms or basements, as it can trap moisture. After any floods, storms, or plumbing mishaps, it’s vital to dry out any water damage within 24 to 48 hours to stop mold from taking hold. Regularly checking for leaks under sinks and around appliances can also help you catch potential problems before they start.
What to Expect from a Professional Remediation
Finding mold in your home is stressful, but knowing what to expect from the remediation process can make it feel much more manageable. When you call in a professional team, you’re not just getting a cleanup crew; you’re getting experts who follow a meticulous, multi-step plan to safely and effectively remove the mold and address the underlying cause. This isn’t just about scrubbing walls—it’s a systematic process designed to protect your home and your family’s health.
From the moment the team arrives, their goal is to assess the situation, contain the problem, and restore your home to a safe, healthy state. Each step builds on the last, ensuring that no detail is overlooked. You can expect a thorough inspection, careful containment of the affected area, physical removal of the mold, air purification, and a final check to confirm the job is done right. Understanding this process will help you feel confident that your home is in good hands.
Step 1: The Initial Inspection and Test
The first thing a professional team will do is a thorough inspection. They need to understand the full scope of the problem before they can create an effective plan. This involves identifying not just the visible mold but also the source of the moisture that’s allowing it to grow. Without fixing the source—whether it’s a leaky pipe, a roof issue, or high humidity—the mold will just come back. The team will use moisture meters and other tools to pinpoint the problem area. In some cases, they may recommend air or surface sampling to identify the specific type of mold and the concentration of spores, which helps inform the remediation strategy.
Step 2: Containment and Safety Measures
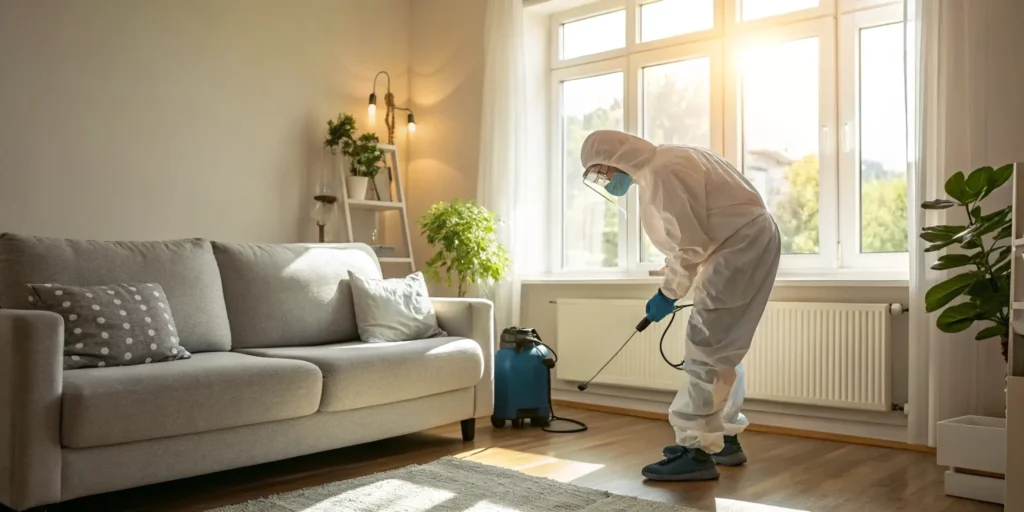
Once the problem is assessed, the next priority is to prevent the mold spores from spreading to other parts of your home. Professionals do this by setting up a containment area. Think of it like a quarantine zone for the mold. They’ll use heavy plastic sheeting to seal off doorways, vents, and any other openings. To ensure spores don’t escape, they often use equipment to create negative air pressure, which pulls air into the contained area and filters it before venting it outside. The team will also wear personal protective equipment (PPE), like masks and suits, to protect themselves and prevent cross-contamination. This step is critical for protecting the unaffected areas of your home.
Step 3: Mold Removal and Cleaning
With the area safely contained, the actual removal begins. This process depends on the type of material affected. For non-porous surfaces like tile or glass, technicians will use antimicrobial cleaners to scrub away the mold. However, for porous materials like drywall, insulation, or carpet, cleaning often isn’t enough. If mold has penetrated deep into these materials, they usually need to be carefully removed, bagged, and disposed of according to regulations. Following the basic mold cleanup steps recommended by the EPA, the team will then clean all surrounding surfaces and ensure everything is completely dry to prevent future growth.
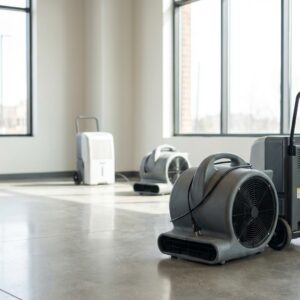
Step 4: Purifying the Air
Even after all visible mold has been removed, microscopic spores can remain in the air. Leaving them behind means the mold could return. That’s why the next step is to purify the air. Professionals use high-efficiency particulate air (HEPA) filters and air scrubbers to capture these tiny, airborne particles. These powerful machines run for a period of time within the containment zone, filtering the air to remove any lingering spores, dust, and other contaminants. This step is something a typical DIY cleanup misses, but it’s essential for restoring healthy indoor air quality and ensuring the remediation is truly complete.
Step 5: The Final Verification Test
After the cleaning is finished and the air has been purified, the team will conduct a final inspection to ensure the remediation was successful. This often involves a visual check and moisture readings to confirm the source of the problem has been resolved. In some situations, a third-party inspector may be brought in to perform post-remediation testing, which provides unbiased proof that the mold is gone and the air quality is safe. Once the area passes inspection, the team can begin the process of fixing any damage, like replacing drywall, painting, or reinstalling flooring, to return your home to its original condition.
A Guide to DIY Mold Removal
Tackling a home project yourself can be incredibly satisfying, and when you spot a little mold, your first instinct might be to grab a sponge and get to work. While a hands-on approach can work for very minor issues, it’s important to know when it’s safe and how to do it correctly. Mold spores can spread easily, and improper cleaning can turn a small problem into a much bigger one.
This guide will walk you through the essentials of DIY mold removal, from figuring out if your situation is manageable to gathering the right supplies and understanding the risks. Think of this as your roadmap to making an informed decision that keeps your home and your family safe. If the job is bigger than you thought, remember that professional help is always available to handle the situation correctly and give you peace of mind.
When is a DIY Approach Safe?
Before you roll up your sleeves, let’s define what makes a mold problem a good candidate for a DIY fix. Generally, you can handle small mold spots yourself if the affected area is less than 10 square feet—roughly a 3-foot by 3-foot patch. This guidance also comes with a big caveat: it’s only for people who don’t have respiratory issues, compromised immune systems, or other health sensitivities to mold.
Most importantly, you have to fix the source of the moisture first. Whether it’s a leaky pipe under the sink or poor ventilation in the bathroom, that issue must be resolved. Mold needs moisture to grow, so cleaning it without addressing the root cause is like mopping up a spill while the faucet is still running.
Your DIY Toolkit and Supplies
Having the right gear is non-negotiable for a safe and effective cleanup. A regular sponge and some soap won’t cut it. Your toolkit should be designed to contain and remove mold without spreading spores throughout your home.
Start by gathering plastic sheeting and tape to seal off the room and prevent spores from escaping. You’ll also need a spray bottle with water to lightly mist the moldy surface before cleaning, which helps keep spores from becoming airborne. When it’s time to clean, use a wire brush on hard surfaces and a simple cleaning solution of soap and water. Finally, a HEPA vacuum is essential for the final cleanup, as standard vacuums can just spread the spores around.
A Step-by-Step Guide to Cleaning Mold
Once you’ve fixed the moisture source and have your supplies, you can start the cleaning process. First, seal off the area with your plastic sheeting. Next, put on all your safety gear—we’ll cover that in a moment. Lightly mist the moldy area with water to keep spores from flying into the air.
Scrub the surface with your cleaning solution until the mold is gone, then dry the area completely with old rags or towels. Dispose of all cleaning materials in a sealed plastic bag. It’s important to understand that this process is very different from professional remediation, which often involves creating negative air pressure and using advanced containment barriers to ensure spores don’t spread.
Safety Precautions You Can’t Skip
This is the most important part of any DIY mold project. Exposing yourself to mold spores can cause allergic reactions, respiratory irritation, and other health problems. Never attempt to clean mold without the proper Personal Protective Equipment (PPE).
Your essential safety gear includes an N-95 respirator mask to prevent you from inhaling spores, safety goggles to protect your eyes, and long, non-porous gloves to protect your hands. It’s also a good idea to wear old clothes that you can either wash in hot water or throw away after the cleanup. Skipping these precautions simply isn’t worth the risk to your health.
The Limits of DIY Mold Removal
Knowing your limits is key. One of the biggest dangers of DIY mold removal is cross-contamination, which happens when you accidentally spread mold spores to other areas of your home. This can happen if you don’t properly contain the area or if you use the wrong equipment, turning a small, localized issue into a widespread problem.
If the mold covers an area larger than 10 square feet, if it’s in your HVAC system, or if you suspect it’s hidden inside walls, it’s time to call a professional. Professionals have the training and specialized equipment to handle extensive contamination safely, ensuring the mold is completely removed without putting the rest of your home at risk.
Breaking Down Mold Remediation Costs
Finding mold in your home is stressful enough without worrying about the cost of getting rid of it. The truth is, there’s no single price tag for mold remediation. The final bill depends on the unique situation in your home, including how much mold there is, where it’s located, and what materials are affected. A small, contained patch of mold on your bathroom tile will cost significantly less to handle than a widespread issue hidden behind your walls.
Understanding the variables can help you get a clearer picture of the potential investment and prepare you for conversations with professionals. We’ll walk through the main factors that determine the price, from the location of the mold to the cost of replacing damaged materials. We’ll also cover the big question of insurance coverage and share some practical tips for managing the expense. This way, you can approach the process with confidence and a solid understanding of what to expect.
Factors That Influence the Price
Several key factors determine the overall cost of mold remediation. The most significant is the size of the affected area. A larger infestation requires more labor, time, and materials to resolve. The type of material the mold is growing on also plays a big role. Mold is easier and cheaper to remove from non-porous surfaces like tile or glass. However, if it has penetrated porous materials like drywall, carpet, or wood, those items often need to be removed and replaced entirely. Finally, the location matters. Hard-to-reach places like attics, crawl spaces, or the inside of walls will increase the cost due to the complexity and labor involved in accessing them safely.
How Location and Access Affect Cost
Where the mold is growing is one of the biggest cost drivers. If you have a small amount of surface mold in an open, easy-to-reach area, the job will be relatively straightforward. However, when mold gets into confined or complex systems, the price can climb quickly. For example, cleaning mold from your home’s heating and cooling (HVAC) system is often the most expensive scenario, potentially costing between $3,000 and $10,000. This is because the entire system must be carefully cleaned and decontaminated to prevent spores from spreading throughout your home every time you turn on the air. Difficult access requires more specialized equipment, safety precautions, and intensive labor, all of which are reflected in the final quote.
Budgeting for Material Replacements
It’s important to remember that mold remediation and home restoration are two different phases. The remediation process focuses on safely removing the mold and contaminated materials. Afterward, you’ll need to budget for replacing anything that had to be torn out. This could include putting up new drywall, laying new carpet, or installing new kitchen cabinets. These reconstruction costs are separate from the remediation itself. For example, you might need to factor in an additional $50 to $80 per square foot for drywall or over $120 per linear foot for new cabinets. A professional remediation company should clearly outline which materials they recommend removing so you can plan for these follow-up expenses.
Will Your Insurance Policy Cover It?
This is one of the first questions every homeowner asks, and the answer is: it depends. Standard homeowner’s insurance policies sometimes cover mold damage, but only if it’s the result of a “covered peril.” For instance, if a pipe suddenly bursts and causes water damage that leads to mold, your policy will likely cover the remediation. However, if the mold grew because of a slow, long-term leak or high humidity you failed to address, it’s often considered a maintenance issue and won’t be covered. Your best first step is to check your insurance policy and call your agent immediately to understand what your specific plan covers.
Tips for Managing Remediation Costs
Feeling sticker shock from a mold remediation quote is common, but you have options. First, make sure you get multiple estimates. We recommend getting quotes from two to four different certified companies to compare pricing and services. When you receive a quote, ask for an itemized breakdown so you can see exactly what you’re paying for. Be cautious of any bid that seems unusually low, as it could be a sign of cut corners. While it’s tempting to save money, improper remediation can leave mold behind, leading to bigger health problems and more expensive repairs down the road. Acting quickly at the first sign of mold can also keep costs down by preventing the problem from spreading.
Keep Mold from Coming Back
Once the mold is gone, the last thing you want is a repeat performance. The good news is that preventing mold from returning is entirely within your control. It all comes down to creating an environment in your home where mold simply can’t get a foothold. Think of it as mold-proofing your space for the long haul. The key is to stay on top of the one thing mold needs to survive: moisture.
By being proactive and consistent, you can protect your home and your family’s health. It doesn’t require a huge overhaul—just a few smart habits and regular attention to problem areas. We’ll walk through the most effective strategies, from managing your home’s humidity to knowing what to look for during routine checks. These simple steps will help you keep your home safe, dry, and, most importantly, mold-free.
Simple Ways to Control Moisture
The golden rule of mold prevention is simple: control the moisture. Mold cannot grow without water, so cutting off its supply is your most powerful defense. Start by addressing any water issues immediately. A small drip under the sink or a minor roof leak can create the perfect breeding ground for mold if left unchecked. Make it a habit to repair plumbing leaks and other water problems as soon as you spot them. After any spill or water incident, be sure to dry all affected items and surfaces completely within 24 to 48 hours. Also, check that your gutters and downspouts are clear and directing water away from your home’s foundation.
Improve Your Home’s Ventilation
Stagnant, humid air is a welcome mat for mold spores. Improving your home’s ventilation keeps air circulating, which helps dry out dampness and reduce moisture buildup. An easy first step is to use your exhaust fans. Run the fan in your bathroom during and after every shower, and use the one in your kitchen while cooking. If weather permits, opening windows for even 15 minutes a day can make a big difference. Also, take a quick look to ensure your clothes dryer is properly vented to the outside and that furniture isn’t blocking any of your home’s air vents. Good home ventilation is a constant, quiet force working to keep your home healthy.
How to Perform Regular Mold Checks
You don’t have to be an expert to keep an eye out for mold. Performing regular checks helps you catch potential problems before they get out of hand. Once a month, do a quick walkthrough of common mold hotspots: under sinks, in basements, around window sills, and in the back of closets. Trust your senses. Look for any visible discoloration—black, green, or white spots—and be alert for a persistent musty or earthy smell. You should also watch for signs of water damage, like peeling paint, bubbling wallpaper, or warped floorboards. If you notice any of these red flags, it’s a sign you need to investigate further.
Manage Your Home’s Humidity
In a place like Palm Beach County, humidity is a fact of life, but letting it run wild indoors is an open invitation for mold. Mold thrives in damp conditions, so it’s crucial to keep your home’s indoor humidity levels in check. Ideally, you should aim to keep the humidity below 45%. A simple tool called a hygrometer can help you monitor these levels. Using a dehumidifier in naturally damp areas like basements, crawl spaces, or laundry rooms is a great way to pull excess moisture from the air. Your air conditioner also plays a key role in dehumidifying your home, so make sure it’s running efficiently and serviced regularly.
Tools That Help Detect Mold Early
Having a few simple tools on hand can make you a more effective mold detective. A moisture meter is an inexpensive and invaluable device that lets you check for dampness in walls, floors, and ceilings. It’s especially useful after a leak to confirm an area is completely dry. Another great tool for prevention is a vacuum with a HEPA filter. Unlike regular vacuums that can spread microscopic mold spores back into the air, a HEPA vacuum is designed to capture them. Using one for your regular cleaning routine helps remove spores before they have a chance to settle and grow, keeping your air and your home cleaner.
How to Choose a Mold Remediation Pro
Finding mold in your home is stressful enough; choosing the right team to handle it shouldn’t add to your anxiety. The company you hire will be responsible for the health and safety of your home, so it’s a decision that requires careful thought. A great mold remediation professional does more than just clean up the visible spots—they identify the source of the moisture, contain the affected area to prevent spread, and ensure the mold is thoroughly removed so it doesn’t return.
Think of this process like hiring any other expert for a critical job. You wouldn’t hire a mechanic without checking their qualifications, and the same principle applies here. You’re looking for a partner who is certified, experienced, and transparent. They should be able to walk you through their process, answer all your questions without hesitation, and provide a clear plan of action. Taking the time to vet your options will give you confidence that the job is being done right, protecting both your property and your family’s well-being. This guide will walk you through the essential things to look for, from credentials to customer service.
Certifications That Matter
When you start looking for a mold professional, certifications are your first quality check. They prove a company has invested in formal training and meets industry standards. The most respected credential in the business comes from the Institute of Inspection, Cleaning and Restoration Certification (IICRC). Look for a company whose technicians are certified.
Specifically, ask if they have a Mold Remediation Specialist (MRS) on staff. This isn’t an entry-level certificate; it requires at least a year of hands-on experience in the field. This tells you the team has practical knowledge and has demonstrated their ability to handle complex mold situations effectively. A certified pro understands the science behind mold growth and removal, which is exactly who you want in your home.
Questions to Ask Before You Hire
Before you sign a contract, it’s time to play detective. A reputable company will welcome your questions and provide clear, direct answers. Start with the basics: How long have they been in the mold remediation business? Experience matters, especially with the unique climate challenges we face in Florida. Ask for references from recent clients in your area so you can hear about their experiences firsthand.
Most importantly, ask for a detailed remediation plan. They should be able to explain their step-by-step process, from containment to final testing. If their answers are vague or they seem reluctant to share details, consider it a red flag. You want a team that is confident and transparent about their work.
Warning Signs to Watch For
Trust your gut. If something feels off with a potential contractor, it probably is. One of the biggest warning signs is a lack of proper certifications, so always ask for proof. Be wary of any company that offers a surprisingly low bid without a thorough inspection—they may be cutting corners.
Another red flag is a reluctance to provide a written estimate or contract. Everything should be documented, including the scope of work, timeline, and costs. High-pressure sales tactics are also a bad sign. A true professional will give you the information you need and the space to make an informed decision. A company that pushes you to sign immediately might have something to hide.
What to Look for in a Service Guarantee
A service guarantee is more than just a promise; it’s your assurance that the company stands behind its work. Don’t just take their word for it—ask for the guarantee in writing. A solid guarantee should clearly outline what is covered and for how long. It should specify what happens if the mold returns, ensuring you won’t be left paying for the same problem twice.
Read the fine print carefully. Does the guarantee cover both the labor and any materials used? Does it include a post-remediation verification test to confirm the mold is gone? A company that offers a comprehensive, written guarantee is confident in its process and committed to your satisfaction, giving you valuable peace of mind.
Finding a Team with 24/7 Availability
Mold and water damage don’t operate on a 9-to-5 schedule. A burst pipe or a leak discovered late at night can’t wait until morning. The longer moisture sits, the more damage it causes and the faster mold can grow. That’s why finding a team with 24/7 emergency availability is so important.
When you’re vetting companies, make this one of your non-negotiables. An immediate response can make a huge difference in the scope and cost of the remediation project. A company that offers round-the-clock service understands the urgency of these situations and is equipped to act fast. This ensures that a professional can be on-site quickly to assess the damage and begin the containment and removal process right away.
Protect Your Home for the Long Term
After professional remediation, the last thing you want is a repeat performance. Keeping mold away for good is all about creating an environment where it can’t thrive. This doesn’t require a complete overhaul of your life, just a few consistent habits and a proactive mindset. By focusing on moisture control and regular check-ins, you can protect your home and your peace of mind. Think of it as ongoing wellness for your property—a little prevention now saves you from major headaches later. Here’s how you can stay on top of it.
Simple Maintenance Habits
The best defense against mold is a good offense, and that starts with your daily and weekly routines. Simple, consistent actions make a huge difference. Get in the habit of running the exhaust fan during and after every shower to pull damp air out of the bathroom. In the kitchen, use the fan over your stove when cooking. If you notice condensation on windows or pipes, wipe it down promptly. Regular cleaning also plays a key role by removing dust and organic materials that mold loves to feed on. These small maintenance habits don’t take much time, but they are incredibly effective at maintaining a dry, mold-resistant environment in your home.
Why You Should Keep Good Records
Keeping a simple log of your home’s environment might sound tedious, but it’s one of the smartest things you can do. Think of it as a health journal for your house. Use a digital or physical notebook to track any water intrusion incidents, like a leaky pipe or a window left open during a storm. It’s also wise to monitor your home’s indoor humidity. You can get an inexpensive device called a hygrometer to get accurate readings. By keeping records of these events and measurements, you can start to see patterns. You might notice humidity spikes every summer, reminding you to run the dehumidifier more often. This data helps you anticipate issues and stop mold before it ever gets a chance to grow.
Your Proactive Prevention Checklist
To make prevention feel less overwhelming, use a simple checklist for regular home inspections. Once a season, walk through your property and look for potential trouble spots. Check under sinks and around toilets for any signs of leaks. Inspect your windows and doors for failing seals that could let in moisture. Take a look at your roof and gutters to ensure they are clear and directing water away from your foundation. You should also focus on improving your home’s air circulation by opening windows on dry, breezy days and using fans to keep air moving. This quick walkthrough helps you catch small problems before they turn into big, expensive ones.
Create a Schedule for Future Testing
Even with the best prevention habits, it’s a good idea to schedule professional mold testing, especially here in humid South Florida. You don’t need to wait until you see or smell a problem. Think of it like a routine dental check-up—it’s a proactive step to confirm your home is healthy. Scheduling an annual or biannual test can give you valuable peace of mind. It can also detect hidden mold that might be growing behind walls or in crawl spaces before it spreads. A regular testing schedule is a smart investment in your property’s value and your family’s health, ensuring your home remains a safe and comfortable space for years to come.
Related Articles
- Mold Testing Guide: Types, Costs & When It’s Necessary | SuperClean Restoration Services
- Mold Testing Services: Cost, Process & Why It Matters | SuperClean Restoration Services
- Mold Removal Services: What Homeowners Should Know | SuperClean Restoration Services
- Hiring Mold Inspection Companies: What You Need to Know | SuperClean Restoration Services
Frequently Asked Questions
Can I just paint over a small mold spot? That’s a tempting shortcut, but it’s one you should definitely avoid. Painting over mold doesn’t kill it or solve the problem. Instead, it just covers it up and can trap moisture, creating an even better environment for the mold to continue growing and spreading underneath the new paint. The only effective solution is to completely remove the mold and fix the moisture issue that caused it in the first place.
What’s the real difference between mold and mildew? It’s easy to confuse the two, but the main difference is how they grow. Mildew is a type of mold that stays on the surface of materials. It’s usually powdery and looks gray or white, like what you might find on a shower curtain. Mold, on the other hand, is more invasive. It can be fuzzy or slimy and its roots can penetrate deep into materials like drywall and wood, causing structural damage over time. While you can often clean mildew yourself, more extensive mold requires professional attention.
How long does a professional mold remediation usually take? The timeline really depends on the size and complexity of the job. A small, straightforward issue in an accessible area, like a bathroom, might only take one to three days to resolve. However, a more widespread problem that involves removing walls or cleaning out an entire crawl space could take a week or more. A professional team will give you a clear and specific timeline after they complete their initial inspection.
Is it safe for my family to be home during the remediation process? For everyone’s safety and comfort, it’s generally best to make arrangements to stay elsewhere during the active removal phase of the project. The process can disturb mold spores, and professionals use containment barriers and air filtration to manage this. To be safe, especially if you have children, pets, or family members with respiratory conditions, it’s wise to be out of the house until the professionals give you the all-clear.
I smell something musty but don’t see any mold. What should I do? You should always trust your nose. A persistent musty or earthy smell is one of the most common signs of hidden mold, which often grows behind walls, under floors, or in attics where you can’t see it. Start by looking for any signs of water damage, like stains or peeling paint, that could point to the source. If you can’t find anything obvious, it’s a good idea to call in a professional for an inspection. They have specialized tools, like moisture meters, to find hidden problems.