Living in Palm Beach County, we know that our beautiful, sunny climate comes with a constant companion: humidity. That moisture in the air, combined with occasional storm damage, makes our homes a perfect breeding ground for mold. It’s not a matter of if you’ll encounter it, but when. This guide is written specifically for Florida homeowners like you. We’ll cover everything from simple prevention strategies that work in our humid environment to a complete breakdown of the professional cleanup process. You’ll learn how to spot the early signs of trouble and what to do in an emergency, ensuring you have a clear plan to protect your property and find the best mold remediation team when you need one.
Key Takeaways
- Assess the Scope Before You Act: If a mold problem is smaller than a 3×3 foot area, a DIY approach can work with the right safety gear. For anything larger, or if you smell a musty odor without seeing the source, it’s time to call a professional to avoid making the problem worse.
- Control Moisture to Prevent Mold: Mold cannot grow without water, so proactive prevention is your best defense. Regularly check for and fix leaks, use exhaust fans in bathrooms and kitchens, and keep indoor humidity below 60% to make your home an unwelcome place for mold.
- Professional Remediation is a Complete Process: Hiring a certified team isn’t just about cleaning; it’s about a systematic approach that includes containing the area to prevent spread, using specialized equipment, and verifying the job is done with air quality testing.
What is Mold and Why is it a Problem?
Finding mold in your home can be unsettling, but it helps to understand what you’re dealing with. Mold is a type of fungus that exists everywhere, both indoors and outdoors. It plays a vital role in nature by breaking down dead organic matter. The problem arises when mold spores, which travel through the air, find a damp spot inside your home to land and grow. A small leak, a humid bathroom, or lingering moisture from a storm can quickly turn into a breeding ground for mold colonies.
Once it takes hold, mold doesn’t just look bad; it can cause significant damage to your property by eating away at materials like drywall, wood, and fabric. This can compromise the structural integrity of your home over time if left unchecked. More importantly, it can impact the air you breathe and the overall health of your home. Because we spend so much time indoors, addressing an indoor mold issue is crucial for maintaining a safe and comfortable living space. Understanding the different types of mold, the potential health effects of mold exposure, and its favorite hiding spots is the first step toward taking control of the situation and protecting your home and family.
The Different Types of Mold in Your Home
You might hear the words “mold” and “mildew” used interchangeably, but they are slightly different. According to the experts at Good Housekeeping, “Mold and mildew are tiny fungi that grow in damp places. Mildew usually starts as white or gray powdery spots and can turn yellow or brown. Mold grows in darker colors like red, green, or black and can look fuzzy.” Mildew is often a surface-level fungus you might find on shower curtains or window sills. Mold, on the other hand, tends to penetrate deeper into materials. While there are thousands of mold species, you don’t need to be a mycologist to know you have a problem. Any visible growth is a sign of excess moisture that needs to be addressed with the right mold remover.
How Mold Can Affect Your Health
Beyond the damage to your home, the biggest concern with mold is its effect on your health. For some people, exposure can trigger allergic reactions and respiratory issues. As one remediation expert explains, “Mold can cause breathing problems, coughing, sneezing, skin irritation, and can lead to long-term diseases.” This is especially true for children, the elderly, and anyone with a compromised immune system or existing respiratory conditions like asthma. Some types of mold also produce mycotoxins, which are harmful substances that can lead to more serious health complications. This is why it’s so important to handle any mold growth promptly and safely, ensuring your home’s air quality is clean and healthy for everyone inside.
Where Mold Loves to Hide
Mold is sneaky and can grow in places you don’t always see. Since it thrives on moisture, its favorite spots are often out of sight. According to The Home Depot, “Mold grows best in warm, wet places like bathrooms, kitchens, and basements.” Think about the areas in your home that fit this description: under sinks with slow drips, behind toilets, in shower corners, or around leaky windows. Basements and crawl spaces are also prime real estate for mold due to their tendency to be damp and poorly ventilated. You might also find it on drywall that’s been exposed to a leak or in your attic if you have a roof issue. Often, the first clue is a persistent musty smell, which is a clear sign you need to get rid of mold.
DIY or Call a Pro? How to Decide
Finding mold in your home can feel overwhelming, and your first instinct might be to handle it yourself. While the DIY spirit is admirable, mold removal is one area where a misstep can have serious consequences for your home and your health. The decision to tackle it yourself or call in a professional really comes down to a few key factors: the size of the problem, the potential costs, and most importantly, safety. Let’s walk through how to make the right choice for your situation.
First, Assess the Scope of the Damage
Before you do anything else, take a careful look at the mold. Is it a small patch of mildew on your shower tile, or is it a large, dark area spreading across a wall? The general rule of thumb recommended by experts, including the EPA, is that if the affected area is larger than 10 square feet (roughly a 3×3 foot patch), it’s a job for a professional. You also need to consider the location. Mold on a hard, non-porous surface is much easier to clean than mold that has seeped into drywall, insulation, or carpeting. Attempting a large-scale or deep-set mold cleanup on your own can actually make things worse by spreading spores to other parts of your home.
Compare the Costs: DIY vs. Professional
It’s easy to assume that a DIY approach will be cheaper, but that’s not always the case. While the initial cost of a few cleaning supplies is low, a failed attempt can lead to much bigger problems. If the mold isn’t completely removed, it will grow back, potentially causing more extensive damage to your home’s structure. An improper cleanup can end up costing far more than hiring a professional from the start. Think of professional remediation as an investment. While it costs more upfront, you’re paying for the expertise and equipment to ensure the mold is gone for good, which prevents further damage and protects your property value.
Know When It’s Time to Call for Help
Sometimes, the decision is made for you. It’s time to put down the scrub brush and pick up the phone if you encounter any of these situations. If the mold covers an area larger than 10 square feet, it’s a clear sign you need professional help. You should also call an expert if you suspect mold is growing inside your walls, under your floors, or in your HVAC system. These are not places for a DIY project. Finally, and most importantly, if anyone in your household has asthma, allergies, or a compromised immune system, don’t take any chances. Your family’s health is the top priority, and a professional team can safely handle the mold without putting them at risk.
Key Safety Differences to Consider
Professional mold remediation isn’t just about cleaning; it’s about doing it safely. Professionals arrive with specialized gear, including full-face respirators, protective suits, and gloves, to protect themselves from inhaling dangerous mold spores. They also use equipment like negative air machines and air scrubbers to contain the work area and prevent cross-contamination to the rest of your home. Without these precautions, a DIY cleanup can release a huge number of spores into the air, creating a significant health hazard. Exposure to these spores can cause respiratory issues, allergic reactions, and other health problems. A professional service eliminates that risk by following strict safety protocols from start to finish.
What to Expect from Professional Mold Remediation
When you hand over a mold problem to a professional team, you’re getting more than just a surface-level cleaning. A certified remediation company follows a strict, systematic process designed to handle the issue completely and safely. They don’t just remove the visible mold; they find the source, contain the area to prevent spread, and use specialized techniques to ensure your home is safe and clean. This professional approach is what separates a temporary fix from a long-term solution, giving you peace of mind that the problem has been handled correctly from start to finish.
Professional Cleaning Techniques Explained
A professional mold remediation plan is a multi-step strategy, not a one-and-done scrub down. The first thing experts do is identify and address the source of the moisture that’s allowing the mold to grow. Next, they’ll set up containment barriers, often using plastic sheeting, to seal off the affected area and prevent spores from spreading to other parts of your home. Contaminated porous materials, like drywall or carpet, are carefully removed and disposed of according to regulations. Finally, all remaining surfaces are thoroughly cleaned with specialized, high-grade antimicrobial products to kill any lingering mold and prevent its return. This methodical process ensures a comprehensive mold cleanup.
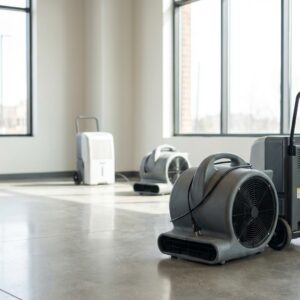
The High-Tech Equipment Pros Use
One of the biggest advantages of hiring a professional is their access to advanced equipment. To find hidden moisture that feeds mold growth, technicians use tools like moisture meters and infrared cameras, which can see what the naked eye can’t. During the cleanup, they use commercial-grade air scrubbers with HEPA filters to capture airborne mold spores, dramatically improving your home’s air quality. This technology allows them to accurately assess the full extent of the problem and confirm that the air in your home is clean and safe once the job is done. It’s a level of thoroughness that’s nearly impossible to achieve with DIY methods.
How Pros Test and Document Their Work
How do you know for sure the mold is gone? Professionals don’t just guess—they test. After the remediation is complete, a reputable company will conduct clearance testing to verify their work. This usually involves taking new air and surface samples from the treated area and sending them to an independent laboratory for analysis. The results provide scientific proof that the mold has been successfully removed and that spore counts have returned to a safe, normal level. This documentation is crucial, not only for your peace of mind but also for insurance claims or future property sales. It’s the ultimate confirmation that your home’s environment is healthy again.
Lasting Moisture Control Solutions
Simply removing the mold isn’t enough; you have to stop it from coming back. A key part of professional service is implementing solutions to prevent future growth. This starts with fixing the original moisture problem, whether it’s a leaky pipe, a roof issue, or poor ventilation in a bathroom. Professionals will offer expert recommendations to control humidity and improve airflow throughout your home. This might involve installing a dehumidifier, improving ventilation systems, or regrading landscaping to direct water away from your foundation. Their goal is to leave you with a home that’s not just mold-free but also far more resistant to future mold problems.
Your Guide to Safe DIY Mold Removal
If you’ve assessed the situation and feel confident tackling a small area of mold (less than 10 square feet), doing it safely is your top priority. Mold can be tricky, and you want to make sure you remove it completely without putting your health at risk. Following the right steps and using the proper gear is essential for a successful DIY job. Here’s how to approach it correctly.
Gear Up: Your Safety Equipment Checklist
Before you touch any mold, you need to protect yourself. Mold spores can easily become airborne during cleaning and can cause respiratory issues and other health problems. Your first step is to assemble your safety gear. You’ll need an N-95 respirator mask to prevent you from breathing in harmful spores. Next, protect your eyes with goggles that don’t have ventilation holes. Finally, wear long rubber gloves to keep the mold and cleaning solutions off your skin. Don’t skip any of these items—they are your first and most important line of defense.
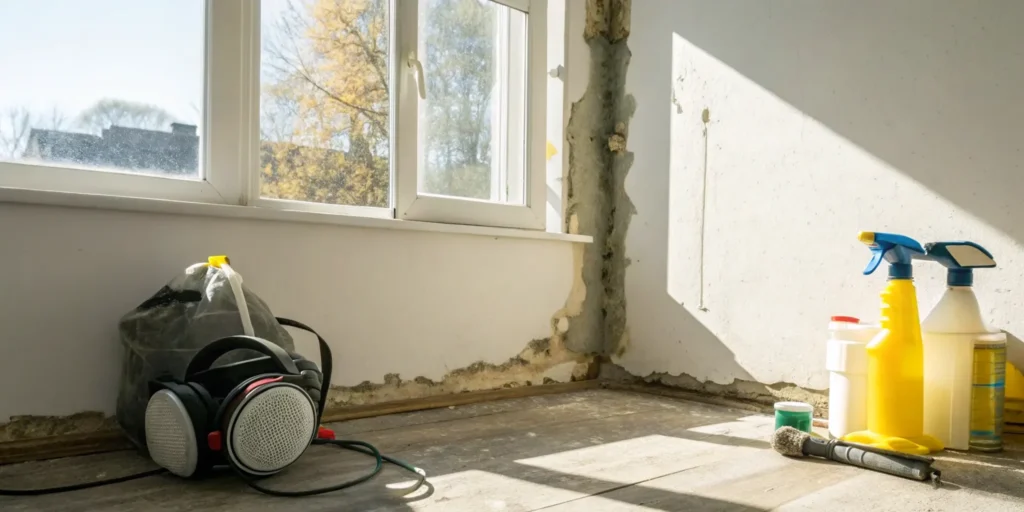
Choose Your Cleaning Solution: Natural vs. Chemical
You have a few options when it comes to what you’ll use to clean the mold. Many commercial mold removal products are available at hardware stores and are specifically formulated for the job. If you prefer a DIY approach, you can use household items. Straight white vinegar is effective on hard, non-porous surfaces. For a stronger option, you can mix one cup of bleach with one gallon of water. When using the bleach solution, apply it to the moldy area and let it sit without rinsing. Always read the instructions on any product you use.
A Step-by-Step Guide to Removal
With your safety gear on and your cleaner chosen, you’re ready to start. First, scrub the mold off hard surfaces like tile or glass using your cleaning solution and a brush. For porous surfaces like drywall, you may need to cut out and replace the affected area, as mold can grow deep inside. Once you’ve cleaned the surface mold, dispose of all your cleaning materials, like rags and sponges, in a sealed plastic bag. This prevents the spores from spreading elsewhere in your home. Finally, clean your tools and any other equipment you used.
Non-Negotiable Safety Precautions
Safety can’t be overstated when dealing with mold. Always make sure the room you’re working in is well-ventilated. Open any windows and use fans to circulate fresh air, as cleaning solutions can have strong fumes. Never mix different cleaning products, especially bleach and ammonia, as this can create toxic gas. If you start to feel dizzy, nauseous, or have trouble breathing, leave the area immediately and get fresh air. Remember, this guidance is for small, contained areas. For larger infestations or if you have any health concerns, it’s always best to call a professional.
The Best Products and Tools for Fighting Mold
When you’re facing a mold problem, having the right products and tools makes all the difference. The market is full of options, from heavy-duty chemical solutions to simple, natural alternatives you might already have in your pantry. What you choose depends on the size of the problem and your comfort level with the cleanup process.
Professionals, like our team at SuperClean Restoration, use specialized, high-grade products designed to eliminate mold at its source and prevent it from returning. These are often more potent than what you can find on store shelves. For smaller, contained issues you decide to handle yourself, there are several effective consumer-grade products that can get the job done. And if you prefer to avoid harsh chemicals, natural solutions can work well on minor surface mold. No matter which route you take, the most important tool is always the right safety gear to protect yourself.
Products the Professionals Trust
When we tackle a mold issue, we bring in the heavy hitters. Professionals often use specialized enzyme treatments that can be aerosolized in a fogger. This method is incredibly effective because it allows the product to seep into porous surfaces like drywall and wood, killing mold that’s hidden deep within the material. We also rely on products like RMR-86 and Tilex Mold and Mildew Remover, which are highly regarded for their efficacy. Rigorous testing shows these formulas can kill 99.9% of mold and mildew, ensuring a thorough and lasting remediation that restores the safety of your home.
Top-Rated Products for a DIY Job
If you’re handling a small, manageable mold spot on your own, you can find some excellent products at your local hardware store. RMR-141 is widely considered the best overall mold remover for household use, as it effectively kills 99.9% of common germs and fungi. Another fantastic choice is Clorox Tilex, which not only eliminates existing mold and mildew but also contains an ingredient that helps prevent new spores from taking root for up to four weeks. These products are great for non-porous surfaces in bathrooms, kitchens, and other high-moisture areas where surface mold tends to appear.
Powerful Natural Cleaning Alternatives
For those who prefer to avoid strong chemicals, a few common household items can be surprisingly effective against small patches of mold. One of the simplest natural cleaning methods involves mixing a quarter teaspoon of baking soda into a cup of water in a spray bottle. Just spray the solution onto the moldy area, scrub with a brush, and wipe clean. Another powerful option is undiluted white vinegar. You can apply it directly to mold on hard surfaces, let it sit for about an hour to break down the growth, and then scrub it away.
Must-Have Tools and Equipment
Before you start any mold cleanup, your first priority should be safety. It is absolutely crucial to protect yourself from inhaling mold spores, which can cause respiratory issues and other health problems. Your essential safety kit should include N-95 or P-100 respirators, safety goggles to protect your eyes, and long, non-porous gloves. For larger, more stubborn areas of mold on outdoor surfaces like concrete or siding, a pressure washer can be an incredibly effective tool. It uses high-pressure water to blast away mold without the need for harsh chemicals, making it a great addition to your mold-fighting toolkit.
The Complete Remediation Process, Step by Step
When you hire professionals for mold remediation, you’re not just paying for a cleaning service. You’re investing in a systematic process designed to safely and completely remove mold from your home and prevent it from coming back. A reputable company follows a strict set of procedures to protect your property and your family’s health. Understanding these steps can give you peace of mind and help you know what to expect when the team arrives. From the initial inspection to the final verification, every stage has a specific purpose. Let’s walk through what a complete, professional remediation looks like from start to finish.
Start with a Thorough Assessment
Before any work begins, a professional team will conduct a thorough assessment. This is more than just spotting visible mold; it’s about playing detective to understand the full scope of the problem. The goal is to identify the source of the moisture that’s feeding the mold, determine the type of mold present, and map out the extent of the contamination, which might be hidden behind walls or under floors. This initial mold inspection is the foundation for the entire remediation plan. Without a proper assessment, you’re just treating the symptoms, not the cause, and the mold will likely return.
Set Up Proper Containment
Once the assessment is complete, the next critical step is containment. To prevent mold spores from spreading to unaffected areas of your home during the removal process, the team will seal off the contaminated area. This usually involves using heavy plastic sheeting and creating negative air pressure with specialized fans that vent air outside. Think of it as creating a secure, isolated work zone. This careful containment strategy is one of the biggest differences between professional remediation and a DIY attempt. It ensures that the problem stays confined to one area instead of becoming a whole-house issue.
Follow a Safe Removal and Cleaning Plan
With the area contained, the physical removal can begin. Professionals follow a strict plan, always wearing personal protective equipment (PPE) like respirators and full-body suits to protect themselves. The process involves carefully removing all mold-infested porous materials, such as drywall, insulation, or carpeting, that can’t be salvaged. Non-porous surfaces are then cleaned with antimicrobial agents. The team uses specialized equipment like HEPA vacuums to capture even the tiniest mold spores. This systematic approach ensures all mold is safely and effectively eliminated from the contained space.
Test Your Air Quality
After the cleaning and removal are finished, how do you know the job is truly done? The answer is air quality testing. Just because you can no longer see the mold doesn’t mean microscopic spores aren’t lingering in the air. A professional service will often take air samples from inside and outside the containment zone to compare spore counts. This step confirms that the air inside your home has returned to a normal, healthy level. It’s a scientific way to measure the success of the remediation and ensure the environment is safe for you and your family to breathe in again.
Verify the Job is Done Right
The final step is verification, which provides ultimate peace of mind. Many reputable companies will recommend a post-remediation verification or “clearance test,” often performed by an independent third-party inspector. This unbiased assessment confirms that the mold has been effectively removed and the underlying moisture issue has been resolved. Receiving a passing clearance report means your home has met the standard for safe re-occupancy. It’s the final seal of approval that proves the remediation was successful and your home is officially clean and healthy once more.
Keep Mold Away for Good: A Prevention Checklist
After you’ve dealt with a mold problem, the last thing you want is a repeat performance. The good news is that preventing mold is much easier than removing it. Being proactive is your best defense against future growth. Think of it as simple home maintenance that protects your property and your peace of mind. This checklist breaks down the four most important areas to focus on to keep your home dry, healthy, and mold-free.
Control Moisture in Your Home
Mold can’t grow without moisture, which makes water control your number one priority. Even a small, slow leak can create the perfect environment for mold to take hold. The most important step you can take is to find and fix any water source, no matter how minor it seems. Make it a habit to check under sinks, around toilets, and near appliances like your dishwasher and washing machine for any signs of drips or water damage. After a heavy Florida rain, it’s also a good idea to check for any new water stains on your ceilings or walls, which could indicate a roof leak. A consistent approach to home maintenance can stop a small issue from turning into a major mold problem.
Improve Your Home’s Ventilation
Humid, stagnant air is a welcome mat for mold. Improving your home’s airflow helps moisture evaporate faster, making it harder for mold spores to settle and grow. The easiest way to do this is by using exhaust fans in your bathrooms, kitchen, and laundry room. Run the fan during a shower or while cooking and for about 15-20 minutes afterward to pull damp air out of the room. On less humid days, opening a few windows can create a cross-breeze that airs out your home. Using ceiling fans also helps keep the air moving. Proper home ventilation is a simple but powerful tool in your mold prevention toolkit.
Create a Regular Inspection Routine
You don’t have to be a professional to spot the early signs of trouble. Creating a simple, regular inspection routine can help you catch mold growth before it gets out of control. Once a month, do a quick walkthrough and look in common hiding spots: inside closets, behind furniture that’s against a wall, around window frames, and in the corners of your basement or garage. Pay close attention to any musty smells. Catching a small spot of mold early means you can clean it up before it spreads into the drywall and insulation, which often requires a much more involved and costly removal process. Think of it as a five-minute task that could save you thousands.
Manage Your Home’s Humidity
Living in Palm Beach County means dealing with humidity is a fact of life, but you don’t have to let it take over your home. Mold thrives in damp conditions, so it’s essential to keep your indoor humidity levels in check. A good rule of thumb is to keep your home’s relative humidity below 60%. Your air conditioner is your best friend here, as it naturally removes moisture from the air. You can also use a dehumidifier in particularly damp areas like basements or bathrooms. A small, inexpensive tool called a hygrometer can help you monitor the humidity levels in your home so you know exactly when you need to take action.
Facing a Mold Emergency? Here’s What to Do
Discovering a major mold problem can feel overwhelming, but having a clear plan makes all the difference. Whether you’ve just recovered from a burst pipe or noticed a musty smell you can’t ignore, acting quickly and correctly is key to protecting your property and your health. Think of this as your emergency action plan. It’s about taking control of the situation one step at a time, from identifying the urgency to getting the right help on the line. We’ll walk you through exactly what to do when you’re facing a mold crisis, so you can feel confident in your next steps.
Know When a Situation is Urgent
Some mold situations are more serious than others, and knowing the difference is crucial. If the mold covers an area larger than 10 square feet (roughly a 3×3 foot patch), it’s generally considered a job for professionals. You should also treat the situation as urgent if you or your family members are experiencing unexplained allergy-like symptoms, such as coughing, sneezing, or skin irritation. These symptoms can point to the serious health risks associated with mold exposure. Certain types of mold produce mycotoxins, which can lead to more severe health issues. If the mold is a result of contaminated water (like sewage backup), don’t wait—call for help immediately.
The First Steps You Should Take
Before you do anything else, your top priority is to address the source of the moisture. Mold can’t grow without water, so find and fix the leak if it’s safe to do so. This could mean shutting off your main water valve or patching a roof leak. Next, try to dry out the affected area by opening windows and using fans or dehumidifiers to circulate air. Avoid running your HVAC system, as this can spread mold spores to other parts of your home. If you see visible mold, smell a musty odor, or just had significant water damage, it’s time to call for a professional inspection to understand the full extent of the problem.
Document Everything for Your Insurance Claim
If you plan to file an insurance claim, thorough documentation is your best friend. Before any cleanup begins, take clear photos and videos of all the affected areas. Capture wide shots of the room and close-ups of the mold and any visible water damage. Write down a detailed timeline of events: when you first noticed the mold, what you believe caused it, and any steps you’ve taken so far. Keep a log of all communication with your insurance company and any contractors. Remember that homeowners insurance coverage for mold can be tricky; it often covers mold resulting from a sudden, covered peril (like a burst pipe) but may not cover issues from long-term neglect.
How to Find Emergency Help Fast
When you need help right away, you don’t have time to waste on unreliable companies. Look for a local restoration service that offers 24/7 emergency response. Start by searching for certified mold remediation specialists in your area and check their reviews. When you call, ask if they are licensed, insured, and can provide references. A reputable company will be transparent and ready to answer your questions. While getting multiple quotes is ideal, in an emergency, focus on finding a trusted professional who can respond quickly. At SuperClean Restoration, we’re always ready to provide fast and efficient emergency service to restore your home’s safety and your peace of mind.
Related Articles
- Mold Testing Services: Cost, Process & Why It Matters | SuperClean Restoration Services
- What Mold Remediation Equipment Do Professionals Use? | SuperClean Restoration Services
- Hiring Mold Inspection Companies: What You Need to Know | SuperClean Restoration Services
- Mold Testing Guide: Types, Costs & When It’s Necessary | SuperClean Restoration Services
- Mold Remediation Near Me: Your Complete Guide | SuperClean Restoration Services
Frequently Asked Questions
Why can’t I just spray bleach on the mold and call it a day? While bleach can kill surface mold on non-porous materials like tile, it’s not a complete solution. It doesn’t address the underlying moisture problem that allowed the mold to grow in the first place, and it can’t penetrate porous surfaces like drywall or wood. A professional remediation process focuses on finding and fixing the water source, containing the area to prevent spores from spreading, and safely removing all contaminated materials to ensure the mold doesn’t come right back.
Is all black mold the dangerous ‘toxic black mold’ I hear about? It’s a common misconception that only black-colored mold is dangerous. The truth is, many types of mold can appear black, and mold of any color can cause health issues or allergic reactions for sensitive individuals. Instead of trying to identify the specific species, it’s best to treat any visible mold growth as a potential problem that needs to be addressed safely and thoroughly to protect your home and your family’s health.
What does a musty smell mean if I can’t see any mold? That persistent, earthy smell is often the first and most reliable sign of hidden mold. Mold thrives in dark, damp places, so it could be growing behind walls, under flooring, or in your attic or crawl space where you can’t see it. If you notice a musty odor that doesn’t go away, it’s a clear signal that you have an excess moisture issue somewhere that needs to be investigated by a professional.
My home always feels humid. Am I guaranteed to get mold? Living in a humid climate like ours in Palm Beach County definitely increases the risk, but it doesn’t make mold inevitable. The key is to manage the indoor humidity. Your air conditioner is your primary tool for this, but you can also use dehumidifiers in problem areas like bathrooms or basements. Keeping your home’s humidity level below 60% and ensuring good airflow will make your home a much less inviting place for mold to grow.
How long does professional mold remediation usually take? The timeline for a professional job really depends on the extent of the problem. A small, contained issue in a bathroom might only take a day or two to resolve. However, a more significant problem that involves removing drywall or addressing a large area could take several days. A reputable company will give you a clear timeline after their initial assessment so you know exactly what to expect.