That persistent musty smell you can’t quite place or the allergy symptoms that seem to get worse at home could be pointing to a hidden problem. Certain types of mold release substances that can affect your health, which is why the term “toxic mold” gets so much attention. Understanding the potential impact is the first step toward creating a safer living environment. This article will help you connect the dots between common health symptoms and a possible mold issue. We’ll give you the knowledge to find where mold loves to hide and provide a clear, actionable plan for a safe toxic mold cleanup, ensuring your home is a healthy space again.
Key Takeaways
- Control Moisture to Control Mold: Simply cleaning visible mold isn’t a permanent fix. The most effective strategy is to find and repair the underlying water source, whether it’s a leak, condensation, or high humidity, to keep mold from returning.
- Gear Up and Isolate the Area: Never tackle mold without the right personal protective equipment, including an N95 respirator, gloves, and goggles. Containing the work zone with plastic sheeting is just as crucial to prevent spores from spreading throughout your home.
- Know When to Call a Professional: A small patch of mold (less than 10 square feet) can often be a DIY project. However, for large infestations, recurring issues, or mold in your HVAC system, calling a certified professional is the safest and most effective choice for your home and health.
What Is Toxic Mold and How Does It Affect Your Health?
Finding mold in your home can be unsettling, especially with all the talk about “toxic mold.” So, what does that actually mean? Simply put, certain types of mold release microscopic substances called mycotoxins. According to the Environmental Protection Agency, molds can also produce allergens and irritants. When you inhale or touch these mold spores, you might experience an allergic reaction or other health issues, particularly if you’re sensitive or have a compromised immune system.
It’s important to remember that not all mold is “toxic,” but since it’s impossible to tell just by looking, all mold growth in your home should be treated with the same level of caution. The key isn’t to panic, but to take action. Removing the mold and addressing the moisture source that allowed it to grow is the most effective way to protect your home and your family’s health. Think of any mold discovery as your home’s way of telling you there’s a moisture problem that needs your immediate attention.
Common Toxic Molds Found in Florida Homes
Here in Florida, our humid climate is the perfect breeding ground for mold. While many types can grow indoors, the one that gets the most attention is Stachybotrys chartarum, often called “black mold.” This type of mold is known for producing mycotoxins and is considered a serious health hazard that can damage both your property and your well-being. However, other molds like Aspergillus and Penicillium are also common and can cause health problems. Since many molds can appear black or dark green, you can’t identify them by color alone. The best approach is to treat any visible mold as a potential risk and handle it promptly.
Health Symptoms to Watch For
How your body reacts to mold can vary widely. Some people might not notice any effects, while others, especially those with allergies or asthma, can have a significant reaction. It’s about paying attention to your body and any new, persistent symptoms that seem to flare up when you’re at home. According to health experts, some of the most common symptoms include coughing and wheezing, a sore throat, a runny or stuffy nose, watery eyes, and itchy skin or rashes. If you or your family members are experiencing these issues without a clear cause, it might be worth checking your home for hidden mold.
Where Mold Loves to Hide in Your Home
Mold is resourceful and can hide just about anywhere there’s moisture, warmth, and a food source like drywall, wood, or fabric. It thrives in damp, dark places that you might not check very often. Common moisture sources that invite mold include leaky faucets, slow-draining pipes, condensation around windows, and even small, unnoticed leaks from a water heater. Be sure to inspect under sinks, in basements or crawl spaces, behind appliances like refrigerators and washing machines, and in attics where roof leaks might occur. Any area that has experienced water damage, even if it seems dry now, is a prime spot for hidden mold growth.
Busting Common Mold Myths
There’s a lot of misinformation out there about mold, so let’s clear a few things up. First, not all mold that looks black is the infamous toxic Stachybotrys chartarum. Many harmless molds are also black. Second, you don’t need to buy special “detox” kits or supplements if you’ve been exposed. Healthline notes that for most people, the body can handle mold on its own once the source is removed. The most effective “detox” is getting rid of the mold in your environment. Finally, a little bit of mold is a big deal because it can spread quickly. Addressing it while it’s a small problem is the best way to prevent it from becoming a major one.
Prepare for a Safe Mold Removal
Before you touch a single moldy spot, taking the right precautions is the most important step you can take. Proper preparation not only protects you and your family from harmful exposure but also prevents the mold from spreading to other areas of your home. Think of it as creating a safe and controlled work environment. Skipping these steps can turn a small mold issue into a much larger, more expensive problem. By setting up your space correctly and gathering the right gear, you ensure the cleanup process is as effective and safe as possible. This groundwork is what separates a successful DIY removal from one that creates more headaches down the road.
Gather Your Protective Gear
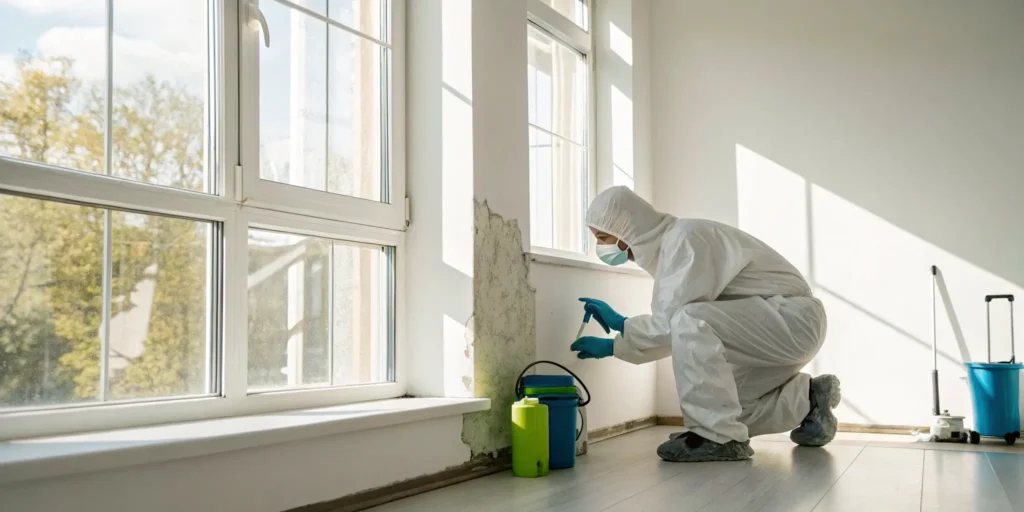
First things first: protect yourself. Mold spores and cleaning fumes can be harmful, so personal protective equipment (PPE) is non-negotiable. You’ll need rubber gloves to protect your hands, safety goggles to shield your eyes from splashes and airborne spores, and a mask or respirator to avoid inhaling anything nasty. An N95 respirator is a good baseline for this kind of work. Wearing old clothes that you can either wash in hot water or throw away afterward is also a smart move. This gear creates a necessary barrier between you and the mold, keeping you safe while you work to make your home safe again.
Set Up a Containment Zone
You don’t want mold spores taking a trip to other parts of your house. To keep the mold contained, seal off the affected area from the rest of your home. You can do this by using heavy plastic sheeting and painter’s tape to cover doorways and vents. If you have a fan, place it in a window blowing out to help pull contaminated air out of the room. This simple step is critical for preventing cross-contamination. By creating a containment zone, you ensure that the mold you’re working so hard to remove stays exactly where it is until it’s gone for good.
Ensure Proper Ventilation
Working with cleaning solutions requires good airflow. Proper ventilation helps clear out both chemical fumes and any mold spores that get kicked up during the cleaning process. Open any windows and doors in the containment area to let fresh air circulate. As mentioned, using a fan to push air out of the window is a great way to direct the airflow away from the rest of your house. This not only makes the air safer to breathe while you work but also helps the area dry out faster once you’re done cleaning, which is key to preventing mold from returning.
Keep Your Family and Pets Safe
Your top priority is the well-being of your loved ones, including the furry ones. The cleanup area should be off-limits to everyone except the person doing the work. This is especially important for vulnerable individuals, such as children, the elderly, and anyone with asthma, allergies, or a compromised immune system. These individuals should not be in the home at all during the removal process. Find a safe place for pets to stay as well, as they can also be affected by mold and cleaning fumes. Keeping everyone clear of the area ensures the cleanup is a stress-free and safe event for the whole household.
How to Find and Assess Mold Damage
Finding mold can be unsettling, but a calm and methodical assessment is the best first step. Before you can deal with the problem, you need to understand its scope. This means figuring out how much mold is present, where it’s located, and what’s causing it to grow in the first place. Simply cleaning the visible spots without addressing the underlying moisture issue is like putting a bandage on a problem that needs stitches—it’s a temporary fix at best. A thorough inspection will give you the information you need to decide whether this is a small project you can handle or a larger issue that requires professional help.
Perform a Visual Inspection
Start with a careful visual inspection of the area where you suspect mold. Look for discoloration on walls, ceilings, or floors—it can appear as black, green, white, or even orange spots. Mold can also have a fuzzy or slimy texture. Pay close attention to areas prone to moisture, like bathrooms, kitchens, laundry rooms, and basements. If you find a suspicious patch, try to determine how large the affected area is. According to the EPA, the size of the mold patch and the type of material it’s growing on are key factors in planning your cleanup. A small spot on a hard surface is very different from a large patch that has soaked into drywall.
Use a Moisture Meter
A moisture meter is an invaluable tool for finding the source of a mold problem. This handheld device measures the moisture content in various materials, like drywall and wood, without causing any damage. By testing the area around the visible mold, you can trace the moisture back to its origin, whether it’s a leaky pipe inside a wall or a crack in your foundation. This helps you understand the full extent of the water damage, not just the part you can see. If you find a patch of mold that seems dry, lightly mist it with water from a spray bottle. This simple step helps prevent dormant mold spores from becoming airborne while you investigate.
When to Consider Professional Mold Testing
While a visual inspection is a great start, there are times when calling a professional is the smartest move. If the mold covers an area larger than 10 square feet, if you suspect it’s inside your HVAC system, or if someone in your home is having health issues that could be mold-related, it’s best to get an expert opinion. Professional mold testing can identify the specific type of mold you’re dealing with and determine the concentration of spores in the air. This is especially important when mold is hidden, as it provides a clear picture of the problem and ensures the remediation plan is effective.
Telltale Signs of Hidden Mold
Mold isn’t always out in the open. Sometimes, the only clues are subtle signs that are easy to overlook. One of the most common indicators is a persistent musty or earthy smell that you can’t seem to trace. Other signs of hidden mold include peeling or bubbling paint, warped walls or floorboards, and dark stains that appear on ceilings or walls with no obvious cause. Because mold needs moisture to survive, these clues often point to an ongoing leak or a serious humidity issue. Finding and repairing the source of the water is the most important step in preventing mold from returning once it’s been removed.
Your Step-by-Step Guide to Removing Mold
Finding mold in your home can be alarming, but tackling a small area is often manageable with the right steps and safety precautions. This guide will walk you through the process of cleaning up minor mold issues. Remember, the key is to work safely and be thorough. If the mold covers more than 10 square feet or you suspect it’s tied to a larger issue like a hidden leak, it’s always best to pause and call in a professional. For smaller spots, here’s how you can get started.
Assess the Area Before You Clean
Before you grab a sponge, take a moment to assess the situation. The first thing to determine is the size of the affected area. According to the U.S. Environmental Protection Agency, if the moldy patch is less than about 10 square feet (roughly a 3-foot by 3-foot square), you can likely handle the cleanup yourself.
Acting quickly is important, as mold can spread and cause more damage the longer it sits. Identify the source of the moisture that’s allowing the mold to grow. Is it a leaky pipe, condensation on a window, or a damp corner in the basement? You’ll need to fix the water problem to prevent the mold from returning.
Choose the Right Cleaning Solution
You don’t necessarily need harsh chemicals to effectively clean small areas of mold. For non-porous surfaces like tile, glass, and countertops, a simple solution of dish soap and water can work well. For a stronger option, you can use a diluted bleach solution. The Centers for Disease Control and Prevention recommends a mixture of no more than one cup of household bleach per one gallon of water.
When using any cleaning product, especially bleach, make sure the area is well-ventilated. Open windows and doors to let fresh air circulate. Apply your chosen solution, let it sit for a few minutes to work on the mold, and then scrub the area with a stiff brush or sponge before rinsing and drying.
Safely Dispose of Contaminated Materials
Some materials are too porous for mold to be completely removed. If you find mold on items like ceiling tiles, carpet, or drywall, they will likely need to be discarded. Trying to clean them often leaves mold spores behind in the material, which can lead to regrowth.
To dispose of these items safely, it’s a good practice to place them in heavy-duty plastic bags and seal them before carrying them through your home. This helps prevent the spread of mold spores to other areas. If you have to cut out sections of moldy drywall or wood, be sure to wear your protective gear, including gloves, goggles, and a mask.
Dry the Area Completely
This is arguably the most important step in the entire process. Mold cannot thrive without moisture, so simply cleaning the visible spots isn’t enough. You have to eliminate the dampness that allowed it to grow in the first place. After cleaning and rinsing the surface, dry it thoroughly with towels.
To ensure the area and the surrounding air are completely dry, use fans to circulate air and a dehumidifier to pull excess moisture from the room. If you fixed a leak, keep an eye on the area for a few days to make sure no new moisture appears. Remember, a dry environment is your best defense against mold coming back.
Confirm the Mold Is Gone
Once you’ve cleaned and dried the area, do a final inspection. The surface should be completely free of any visible mold, and the musty odor should be gone. If you still smell mold, it could be a sign that you missed a spot or that the mold is growing in a hidden area, like behind a wall.
If the mold returns after a few days, it means the underlying moisture problem hasn’t been solved or the initial cleaning wasn’t thorough enough. For stubborn mold, recurring issues, or any job that feels too big to handle, it’s time to call for professional help. Our team at SuperClean Restoration can identify the source and ensure the mold is removed safely and completely.
When to Call a Professional for Help
Tackling a home project yourself can be incredibly satisfying, but some jobs are best left to the experts—and mold removal is definitely one of them. While a small spot of mildew in the shower is one thing, a larger mold problem can pose serious risks to your home’s structure and your family’s health. It’s not about admitting defeat; it’s about making the smartest, safest choice for your property and your peace of mind. Knowing when to put down the scrub brush and pick up the phone is the first step toward a real, lasting solution.
Professional remediation isn’t just about cleaning what you can see; it’s about addressing the root cause of the moisture, containing the spread of harmful spores, and ensuring the problem doesn’t come right back. In a humid climate like ours here in Palm Beach County, a small issue can escalate quickly. That’s why understanding the line between a DIY task and a job for a certified professional is so crucial for protecting your investment and your well-being. This section will walk you through the key signs that it’s time to call for backup, how to choose the right team for the job, what to expect in terms of cost, and what the professional process actually looks like from start to finish.
Signs It’s Time to Call an Expert
Let’s be honest, it can be tempting to try and handle a mold issue on your own. But certain situations require professional attention right away. If you notice any of these signs, it’s time to call for help. A major red flag is the size of the affected area. If the mold covers more than 10 square feet (think of a 3-foot by 3-foot patch), the U.S. Environmental Protection Agency (EPA) recommends calling in a professional. You should also call an expert if you suspect mold is hiding in your HVAC system, as this can spread spores throughout your entire home. If someone in your household has a weakened immune system, asthma, or severe allergies, don’t take the risk. Finally, if mold returns after you’ve cleaned it, that’s a clear sign of an underlying moisture problem that a DIY solution won’t fix.
How to Choose a Qualified Remediation Service
Once you’ve decided to hire a professional, you want to make sure you’re choosing a reputable and qualified company. Your home is your biggest investment, so this isn’t the time to cut corners. Start by looking for a service with specific experience in mold remediation and check that they follow established industry guidelines. A trustworthy company will be transparent about its process and credentials. Ask if they are certified by an organization like the IICRC (Institute of Inspection, Cleaning and Restoration Certification). Don’t forget to verify that they are fully licensed and insured in Florida—this protects you and your property. Finally, read recent customer reviews and ask for a detailed, written estimate before any work begins.
Understanding the Costs
The cost of professional mold remediation can vary quite a bit, so it’s helpful to have a general idea of what to expect. The final price depends on several factors, including the size of the infestation, where it’s located (a crawlspace is harder to access than a bathroom wall), and what materials need to be removed and replaced. For a smaller, contained issue like mold under a kitchen sink, you might expect to pay anywhere from $700 to $4,000. Most homeowners typically spend around $1,500 to $2,000 for this type of job. While it might seem like a significant expense, think of it as an investment in your home’s health and value. Ignoring a mold problem will only lead to more extensive and costly damage down the road.
What to Expect During the Remediation Process
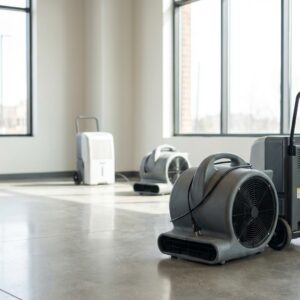
A professional mold remediation process is thorough and systematic, designed to safely remove the mold and prevent it from returning. First, the team will assess the damage and find the source of the moisture. Next, they will set up a containment zone, using plastic sheeting and negative air pressure machines to keep mold spores from spreading to other parts of your home. They’ll use HEPA air scrubbers to filter the air during the entire process. After containment is set, the crew will carefully remove all mold-infested materials, like drywall or insulation, and clean the remaining surfaces with antimicrobial treatments. Once everything is clean, they will use industrial-grade equipment to thoroughly dry the area before beginning any necessary repairs.
How to Keep Mold from Coming Back
After you’ve put in the hard work of cleaning up a mold problem, the last thing you want is for it to return. The good news is that preventing mold is all about creating an environment where it simply can’t thrive. Mold has a few basic needs: moisture, a food source (like drywall or wood), and the right temperature. While you can’t get rid of every potential food source, you have a lot of control over the moisture levels in your home.
Think of it as mold-proofing your space. By staying on top of a few key areas, you can make your home an unwelcome place for mold spores to settle and grow. This isn’t about constant, stressful vigilance; it’s about building simple, effective habits into your home maintenance routine. From fixing tiny leaks to improving airflow, these proactive steps are your best defense against a repeat appearance. Taking these measures will not only keep mold at bay but also contribute to a healthier, more comfortable living environment for you and your family. It’s about peace of mind, knowing you’ve secured your home from the ground up.
Control Moisture in Your Home
The number one rule for preventing mold is to control moisture. Mold needs water to grow, so cutting off its supply is the most effective strategy. Start by doing a thorough check for any leaks in your home. Look under sinks, around toilets and tubs, near windows, and in the attic. Even a slow, tiny drip can create the perfect damp spot for mold to flourish. If you find any leaks, it’s important to repair them immediately. Don’t forget to check your gutters and downspouts to ensure water is being directed away from your home’s foundation. A little preventative maintenance goes a long way in keeping your home dry and mold-free.
Improve Your Home’s Ventilation
Stagnant, humid air is a welcome mat for mold. Improving your home’s ventilation helps keep air circulating, which dries out damp surfaces and lowers overall humidity. Make it a habit to use exhaust fans in your kitchen when cooking and in your bathrooms during and after a shower. If you don’t have exhaust fans, cracking a window open for 15-20 minutes can help. You can also use ceiling fans or portable fans to keep air moving in areas that tend to feel stuffy, like basements or laundry rooms. The U.S. Environmental Protection Agency highlights that good airflow is a simple yet powerful tool in your mold prevention toolkit.
Create a Regular Inspection Routine
Catching a potential mold problem early is crucial. The longer mold is left to grow, the more damage it can cause and the harder it is to remove. Set a reminder to do a quick inspection of your home once a month. Check those common mold hotspots: under sinks, in bathroom corners, around window sills, and in the basement. Look for any signs of water damage, discoloration, or musty odors. If you spot something suspicious, you can address it right away before it becomes a major issue. This simple routine takes just a few minutes but can save you a lot of time, money, and stress down the road.
Manage Indoor Humidity Levels
Living in Florida, we know all about humidity. Unfortunately, so does mold. High indoor humidity can lead to condensation on walls, windows, and other surfaces, creating the damp conditions mold loves. Ideally, you should keep your home’s humidity level between 30% and 50%. You can monitor this with a small, inexpensive device called a hygrometer. If your levels are consistently high, using a dehumidifier can make a huge difference, especially in naturally damp areas like basements and bathrooms. Running your air conditioner also helps remove moisture from the air, keeping your home comfortably dry.
Your Mold Removal Toolkit
Tackling a small mold problem yourself requires more than just a sponge and some determination. Having the right tools on hand is non-negotiable for both your safety and the effectiveness of the cleanup. Think of this as your essential mold-fighting arsenal. Before you even touch a moldy surface, you need to be fully prepared with the proper cleaning agents, protective gear, and equipment. This isn’t just about scrubbing away a stain; it’s about safely removing a potential health hazard and ensuring it doesn’t return.
For minor issues on hard surfaces, a DIY approach can work if you’re properly equipped. However, many of the most effective tools are professional-grade for a reason. They are designed to contain microscopic spores and address moisture at the source—something household fans and vacuums just can’t do. As you gather your supplies, be honest about the scope of the problem. If the mold covers more than 10 square feet or you suspect it’s hiding in your walls, your most important tool is your phone to call in a professional.
Recommended Cleaning Products
When it comes to cleaning solutions, you have a few effective options for hard, non-porous surfaces like tile or glass. A common recommendation is a solution of one cup of bleach mixed with a gallon of water. Never mix bleach with ammonia or other household cleaners, as this can create toxic fumes. If you prefer a less harsh alternative, undiluted white vinegar can also work. Just spray it directly onto the mold, let it sit for an hour, and then wipe the area clean. For porous materials like drywall or carpet, cleaning isn’t enough—they usually need to be removed and replaced.
Your Safety Gear Checklist
Protecting yourself is the most important step in any mold cleanup. Mold spores can easily become airborne and cause respiratory issues or allergic reactions. Before you start, make sure you have the right personal protective equipment (PPE). Your checklist should include rubber gloves, safety goggles to protect your eyes from spores and cleaning fumes, and a mask. The U.S. Environmental Protection Agency recommends using at least a NIOSH-approved N95 respirator to protect yourself from mold spores. For larger jobs that involve tearing out contaminated materials, it’s best to use a half-face or full-face respirator for even greater protection.
Professional-Grade Removal Tools
For a truly thorough cleanup, professionals rely on specialized equipment. Standard household vacuums can actually spread mold spores, so experts use HEPA (High-Efficiency Particulate Air) vacuums to trap them. Another key tool is an air scrubber, which is essentially a powerful portable air filtration system that removes airborne contaminants during the remediation process. If you’re dealing with a significant mold problem, especially one caused by a water leak, you’ll also see professionals using commercial-grade dehumidifiers and air movers to completely dry the area and prevent regrowth. These tools are a big reason why a professional mold remediation service is often the safest bet.
Air Quality Monitors
How do you know when the job is truly done? After a cleanup, you want to be sure the air in your home is safe to breathe. Air quality monitors can detect the level of particulates, including mold spores, in the air. While consumer-grade monitors can give you a general idea of your home’s air quality, professionals use more sensitive equipment to conduct air sampling before and after remediation. This testing confirms that the spore count has returned to a normal, healthy level. Paired with tools like air scrubbers, monitoring ensures that the air is not only clean but stays that way.
Related Articles
- Mold Remediation Near Me: Your Complete Guide | SuperClean Restoration Services
- Mold Testing Guide: Types, Costs & When It’s Necessary | SuperClean Restoration Services
- Mold Testing Services: Cost, Process & Why It Matters | SuperClean Restoration Services
- Choosing the Right Mold Test Company: A Practical Guide | SuperClean Restoration Services
Frequently Asked Questions
Is all black-colored mold the dangerous “toxic black mold” I hear about? Not necessarily. Many types of mold can appear black, and not all of them are the infamous Stachybotrys chartarum. Since you can’t tell what type of mold you have just by looking at it, the safest approach is to treat any mold growth with caution. The color isn’t as important as the fact that you have a moisture problem that needs to be fixed to prevent further growth.
Can I just paint over a small mold spot? Painting over mold is never a good idea. While it might cover the stain for a little while, the mold is still alive and growing underneath. It will eventually eat through the paint and reappear, and in the meantime, it can continue to damage the drywall and release spores. You have to completely remove the mold and fix the water source first.
What’s the real difference between cleaning mold myself and hiring a professional? When you clean a small spot of mold, you’re mostly addressing the visible surface. A professional remediation service does much more. We use containment strategies to prevent spores from spreading throughout your home, use specialized equipment like air scrubbers to purify the air, and have the tools to find and fix the hidden moisture source. It’s a comprehensive solution designed to get rid of the problem for good.
What should I do if I think mold in my home is making my family sick? If you’re concerned about health symptoms, the first step is to talk to a doctor. At the same time, it’s wise to have your home inspected by a professional. We can help determine if you have a hidden mold problem that could be contributing to the issue. Addressing the source of the mold is the most effective way to improve your home’s indoor environment.
After cleaning, how can I be absolutely sure the mold is gone for good? The best indicator that the mold is gone is that you no longer see any visible growth and the musty smell has disappeared. However, the real confirmation comes from solving the underlying moisture issue. If you’ve repaired the leak or improved the ventilation that allowed the mold to grow in the first place, you’ve created an environment where it can’t come back.