A water stain on the ceiling is more than just an ugly blemish; it’s a warning sign from your home that something is wrong. Ignoring it is never an option, as a small leak can quickly escalate into a major problem involving structural rot and unhealthy mold growth. Understanding the root cause—whether it’s a leaky roof, faulty plumbing, or an HVAC issue—is the key to a lasting solution. This article is your complete resource for tackling this common household issue. We’ll explore the typical culprits behind the damage and provide a clear roadmap for a safe and effective ceiling water damage repair, helping you protect your property and your peace of mind.
Key Takeaways
- Prioritize Safety and Documentation: Before you do anything else, turn off the electricity to the affected area to prevent electrical hazards. Once it’s safe, take clear photos and videos of all the damage for your insurance claim.
- Fix the Leak Before the Stain: A ceiling stain is just a symptom of a bigger problem. A lasting repair requires finding and stopping the source of the water first; otherwise, you’re just covering up an issue that will definitely come back.
- Know When to Call for Help: While a small, dry stain might be a manageable DIY project, signs like a sagging ceiling, widespread discoloration, or a musty smell are clear indicators that you need a professional to handle the repair safely and effectively.
How to Spot Ceiling Water Damage
Catching ceiling water damage early can save you a lot of headaches and money down the road. What might start as a small, faint spot can quickly become a major problem, affecting your home’s structure and even your family’s health. Knowing what to look for is the first step in protecting your property. It’s about more than just aesthetics; it’s about keeping your home safe and sound. Let’s walk through the signs, from the super obvious to the subtle clues you might otherwise miss.
Obvious Visual Cues
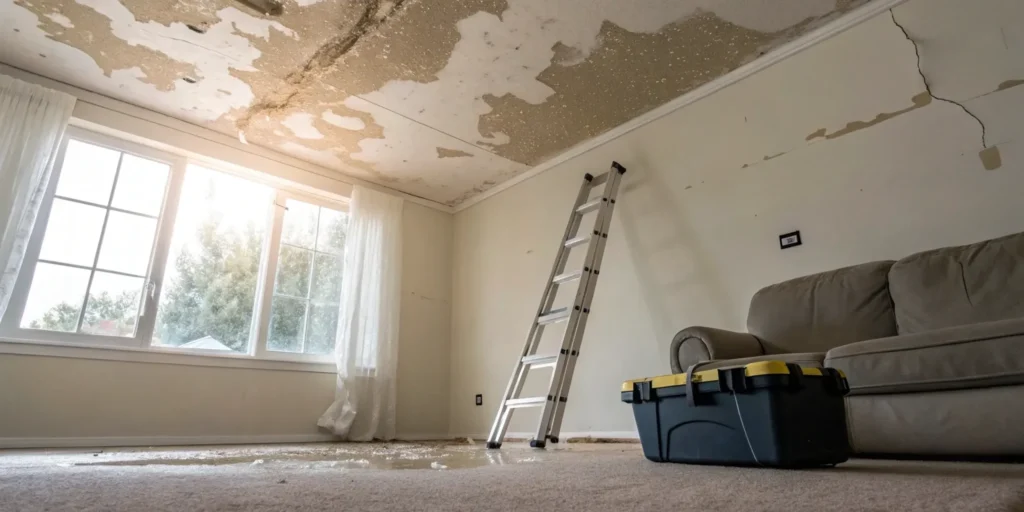
The most straightforward signs of water damage are the ones you can see. You might notice yellowish or brownish stains spreading across your ceiling, which is often the first red flag. These discolored patches mean water has soaked into the drywall or plaster. You may also see peeling, bubbling, or cracking paint as moisture pushes it away from the surface. In more active leak situations, you could see actual water drips or feel damp spots on the ceiling. It’s easy to dismiss these as minor annoyances, but they are clear indicators of a bigger issue. A water-damaged ceiling is a serious problem that can lead to rot and mold if not addressed quickly.
Signs of Structural Trouble
When water soaks into ceiling materials, it adds weight and weakens their integrity. This can lead to visible structural problems that demand immediate attention. Look for any sagging or bulging areas in the ceiling; this indicates that the material is saturated and losing its strength. You might also spot cracks appearing and spreading from the damp area. These are not just cosmetic flaws—they are warnings that the ceiling is under stress. A water-damaged ceiling can become unsafe and even face a risk of collapse. If you see any of these signs, it’s crucial to treat the situation as an emergency to prevent further damage or injury.
Hidden Clues to Look For
Sometimes, the signs of water damage aren’t so obvious. You have to rely on your other senses to detect a problem. A persistent, musty odor in a room can be a tell-tale sign of moisture hiding in the ceiling or walls, even if you can’t see a stain. You might also notice a change in the room’s atmosphere, like unexplained humidity or a damp feeling in the air. It’s important not to ignore this hidden damage, because even if the surface looks fine, moisture could be slowly causing rot and mold growth out of sight. Trust your instincts—if something feels or smells off, it’s worth investigating further.
Understanding the Health Risks
A water-damaged ceiling isn’t just a threat to your home; it’s a threat to your health. Damp, dark environments are the perfect breeding ground for mold, which can begin to grow within just 48 to 72 hours of a water event. Mold releases spores into the air that can cause a range of health issues, especially for children, the elderly, and anyone with allergies, asthma, or a compromised immune system. The potential health effects of mold include respiratory problems, allergic reactions, headaches, and skin irritation. Acting fast to dry the affected area is critical not only for your property but for the well-being of everyone living in your home.
What Causes Ceiling Water Damage?
Seeing a stain spread across your ceiling is alarming, and your first thought is probably, “Where is that water coming from?” Pinpointing the source is the critical first step toward fixing the problem for good. Water is tricky and can travel far from the initial leak before it finally shows up on your ceiling, making the detective work a little challenging. The culprit could be right above the stain, or it could be a leaky pipe several feet away. Understanding the most common causes can help you narrow down the possibilities and figure out your next move. From the roof over your head to the pipes in your walls, let’s look at the usual suspects behind ceiling water damage.
Leaky Roofs and Flashing
Your roof is your home’s first line of defense against the elements, so when it’s compromised, your ceiling is often the first place you’ll see evidence. A leak might be caused by missing or damaged shingles, but often the problem lies with the flashing. Flashing is the thin metal material installed around vents, chimneys, and skylights to direct water away. If it’s cracked, rusted, or has pulled away from the roof, it creates a perfect entry point for rain. It’s a good idea to visually inspect your roof from the ground, especially after a heavy storm, to check for any obvious signs of trouble.
Faulty Plumbing and Pipes
Not all ceiling leaks come from the roof. If the water damage is on a lower floor, there’s a good chance the problem is your plumbing. A slow, persistent drip from a supply line to a toilet, a leaky shower pan, or a cracked drainpipe in an upstairs bathroom can saturate the subfloor and drywall below. These leaks are often hidden behind walls, so you might not notice them until a stain appears or the drywall begins to feel soft and spongy. An overflowing sink or bathtub is a more obvious cause, but even small, hidden plumbing leaks can lead to significant damage over time if they aren’t addressed.
HVAC System Condensation
In a warm, humid climate like ours in Palm Beach County, your air conditioner works hard. A standard part of that process is creating condensation, which is normally collected in a drain pan and routed outside through a condensate line. If that line gets clogged with algae or debris, the pan can overflow, spilling water into your attic or ceiling. A cracked drain pan or an issue with your unit’s insulation can also cause leaks. If you notice water damage near an indoor air handler, your HVAC system is the likely source. Regular maintenance can help prevent these clogs and keep everything flowing as it should.
Storms and Heavy Rain
While a standard leaky roof can cause problems during any rain shower, severe weather brings its own set of challenges. Here in Florida, we know that hurricanes and tropical storms can push water into your home in ways you wouldn’t expect. Wind-driven rain can force its way under shingles and into tiny gaps around windows or through roof vents. A sudden, heavy downpour can overwhelm your gutters, causing water to pool along the edge of your roof and seep into the structure. This kind of intense, sudden water intrusion requires a fast response to protect your home from further issues like mold growth.
Your Emergency Action Plan
Discovering a water stain spreading across your ceiling is stressful. Before you do anything else, take a deep breath. The key is to act quickly but calmly. This emergency action plan walks you through the first critical steps to control the situation and prevent further damage. Think of it as your immediate to-do list. By following these steps, you can protect your family, document the damage for your insurance, and start the process of getting your home back to normal.
Put Safety First
Your top priority is safety. Water and electricity are a dangerous combination, so head to your breaker box and turn off the power to the affected rooms to eliminate any electrical hazards. If you’re unsure which breaker to flip, it’s safest to shut off the main power. Also, be mindful of the ceiling’s structural integrity. If it’s sagging noticeably, the drywall is saturated and could collapse. Keep a safe distance and don’t stand directly underneath the damaged area.
Document for Your Insurance Claim
Once the area is safe, grab your phone and start documenting everything. Take clear photos and videos of the damage from multiple angles, capturing the water stain, any drips, and damage to walls, floors, and personal belongings. The more evidence you have, the smoother your water damage insurance claim process will be. Don’t move or throw anything away until you’ve photographed it. This visual record is crucial for proving the extent of the damage to your insurance provider.
Find the Source of the Water
The ceiling stain is just a symptom; the real problem is the leak. If you can, try to identify where the water is coming from. It could be a leaky pipe, an issue with an upstairs bathroom, a faulty HVAC unit, or a compromised roof. Sometimes the source is obvious, but often it’s hidden. Simply painting over the stain without fixing the leak is a huge mistake that will only lead to more extensive damage and potential mold growth down the road.
Apply Temporary Fixes
While you wait for professional help, take a few simple steps to mitigate the damage. Place buckets or waterproof containers directly under any drips to catch the water and protect your floors. If the leak is small, you can poke a small hole in the center of the water stain to allow it to drain into a bucket in a controlled way. This relieves pressure and can prevent the water from spreading. Also, move any furniture, rugs, and electronics out of the affected area.
A Guide to DIY Ceiling Repair
If you’ve caught the water damage early and it seems minor, you might be able to handle the repair yourself. Tackling a DIY project can be rewarding, but it’s important to follow the right steps to ensure a safe and lasting fix. This guide will walk you through the process, from assessing the damage to applying that final coat of paint. Remember, the goal is not just to cover up the stain but to address the underlying issue so it doesn’t happen again.
Assess the Damage and Plan Your Repair
Before you even think about patching drywall, your first job is to play detective. You need to find the source of the water and stop it. A ceiling stain is just a symptom; the real problem could be a leaky pipe, a damaged roof, or a faulty appliance on the floor above. Once you’ve stopped the leak, you can properly assess the damage. Is the drywall just discolored, or is it soft, sagging, or crumbling? The extent of the damage will dictate your repair plan. A small, firm stain might only need cleaning and painting, while a sagging section will require a full replacement. Always address the cause before you start any cosmetic repairs.
Dry the Area Completely
Patience is your best friend during this step. Before you can repair anything, the entire area must be bone dry. We’re not just talking about the surface you can see and touch—moisture loves to hide in insulation, wood joists, and the backside of your drywall. Trapped moisture is a perfect breeding ground for mold. Use fans to circulate air and a dehumidifier to pull moisture out of the room. Depending on the extent of the water damage, this process could take several days. Don’t rush it. A thorough drying process is your best defense against future mold problems and ensures your ceiling repairs will last.
Replace Damaged Materials
If the drywall is soft or sagging, it has to go. There’s no saving it. Use a utility knife or drywall saw to carefully cut out the damaged section, extending your cut a few inches into the surrounding dry, stable drywall. Once it’s removed, inspect the area above. Is the insulation soaked? If so, you’ll need to remove and replace that as well. This is also your chance to double-check that the leak is truly fixed. For smaller areas, you can use a drywall patch kit. For larger holes, you’ll need to cut a new piece of drywall to size and secure it to the ceiling joists.
Finish and Paint Your Work
Now for the finishing touches that make the repair disappear. Apply joint compound, or “mud,” over the seams of your new drywall patch, using drywall tape to reinforce the joints. You’ll likely need to apply two or three thin coats, sanding lightly between each one, to get a perfectly smooth surface. Once you’re happy with the finish, apply a coat of stain-blocking primer. This is a non-negotiable step—it prevents any residual water stains from bleeding through your new paint. Finally, paint the patched area to match the rest of your ceiling, feathering the edges to blend it in seamlessly.
Common DIY Mistakes to Sidestep
Even the most confident DIYer can make a few common missteps. The biggest mistake is painting over a stain without fixing the leak first. This only hides the problem temporarily and allows more damage to occur. Another frequent error is not allowing the area to dry completely, which can lead to hidden mold growth inside your ceiling. Finally, don’t wait too long to start the repair. The longer you let water damage sit, the greater the risk of structural issues and widespread mold. Not repairing the damage fast enough can turn a small fix into a major project. If you feel overwhelmed, it’s always better to call for professional help.
When Should You Call a Professional?
Tackling a home repair project yourself can be incredibly satisfying, but some jobs are best left to the experts. Water damage is one of those areas where a small mistake can lead to big, expensive problems down the road. Knowing when to put down the tools and pick up the phone is key to protecting your home and your peace of mind. If you’re on the fence, consider a few factors that can help you decide whether to call in a professional for your ceiling repair.
Red Flags for Serious Damage
A small, contained stain might seem manageable, but water-damaged ceilings can be deceptive. They often hide more significant issues that can quickly lead to rot, mold, and a weaker house structure. If you see the ceiling sagging, bulging, or cracking, that’s a major red flag. Widespread discoloration or a stain that keeps growing are also signs that the problem is more than just cosmetic. And if you see or smell mold, it’s time to stop. Mold can spread quickly and pose health risks, requiring specialized equipment and techniques to remove safely. These are clear indicators that the water has caused significant damage that needs a professional assessment.
If the Repair Seems Too Complex
Trust your gut. If you’ve assessed the damage and the repair feels overwhelming, it probably is. For serious damage, especially when the ceiling is sagging or has visible mold, it’s always best to get help from professionals. Professionals are equipped to handle complex situations that involve structural components, electrical wiring, or extensive drywall replacement. They have the experience to not only fix the visible damage but also to identify and resolve the underlying cause of the leak, ensuring the problem doesn’t come back. A pro can get the job done safely and efficiently, saving you from a potentially dangerous and frustrating project.
Comparing DIY vs. Professional Costs
While doing it yourself can save money on labor, it’s important to weigh the full financial picture. The average cost for professional ceiling repairs can range from around $400 to over $1,700, depending on the extent of the damage. Keep in mind that this doesn’t include the cost of fixing the original leak. If you attempt a DIY repair that fails, you could end up paying for the initial materials plus the cost of a professional to fix your work and the now-worsened damage. A professional quote gives you a clear, upfront cost and the assurance that the job will be done right the first time.
What Your Insurance Policy Requires
Before you start any repairs, pull out your homeowner’s insurance policy. Your home insurance typically covers sudden and accidental water damage, like a burst pipe or a leaking roof after a storm. Many insurance providers require that the restoration work be performed by a licensed and certified professional to ensure it meets industry standards. Attempting a DIY repair could potentially jeopardize your claim, especially if the work isn’t done correctly and leads to further issues like mold. Always check with your insurance agent to understand your coverage and any requirements for professional restoration.
Gather Your Tools and Materials
Alright, before you jump into the repair, let’s talk about getting your supplies in order. Having everything you need on hand before you start will make the process so much smoother and safer. Think of it like prepping your ingredients before you start cooking—it just makes everything easier. This list covers what you’ll need for a smaller, more manageable repair. If your situation looks more serious, your first step should be calling for professional help instead of heading to the hardware store. A major issue requires a professional approach to ensure your home is structurally sound and safe from hidden threats like mold.
Your Essential Toolkit
For a basic patch-up job, you’ll want a few key items. Start with a bucket to catch any remaining drips and sponges for cleanup. You’ll also need a utility knife to cut away damaged drywall, a putty knife for applying filler, and some spackle or joint compound. Don’t forget sandpaper for a smooth finish. Remember, what you see on the surface might not be the whole story. It’s crucial to look for hidden water damage, because ignoring underlying issues can lead to bigger problems down the road.
How to Choose the Right Materials
When you’re at the hardware store, you’ll need a small piece of drywall to patch the hole, drywall tape for the seams, and a good quality, stain-blocking primer. The primer is key—it prevents the water stain from bleeding through your new paint. If you notice the damage is widespread, the ceiling is sagging, or you see any signs of mold, it’s time to pause. These are clear indicators that the problem is beyond a simple DIY fix, and it’s best to get a professional assessment.
Must-Have Safety Gear
Your safety is the top priority. Before you do anything else, head to your circuit breaker and turn off the electricity to the affected area. This is non-negotiable, especially with water involved. You’ll also want to protect yourself with some basic gear. Grab a pair of sturdy gloves, safety glasses to shield your eyes from dust and debris, and a dust mask to avoid inhaling any particles, especially during sanding. It might feel like a hassle, but taking these simple safety precautions is always worth it.
Helpful Specialty Tools
While not strictly necessary for every small repair, a few specialty tools can make a world of difference. A moisture meter is an incredibly useful gadget that helps you confirm the ceiling joists and surrounding drywall are completely dry before you start patching things up. Sealing in moisture is a recipe for mold growth. A stud finder can also be a lifesaver, helping you locate the ceiling joists so you can securely attach your new piece of drywall. These tools help you do the job right the first time.
How to Prevent Future Water Damage
After going through the stress and expense of repairing a water-damaged ceiling, the last thing you want is a repeat performance. The good news is that a little proactive care can go a long way in protecting your home. By creating a simple maintenance plan, you can catch small issues before they turn into major disasters. Think of it as an investment in your peace of mind and your property’s value. These steps don’t require a ton of time, but they can save you from significant headaches down the road.
Living in Florida, we know that heavy rain and humidity are just part of life, which makes staying on top of home maintenance even more critical. From routine checks to smart home upgrades, here are some practical ways to keep your ceilings dry and your home safe.
Schedule Regular Inspections
Setting aside time twice a year—say, in the spring and fall—to walk around and inside your property can help you spot trouble early. You don’t need to be an expert; you just need to know what to look for. Check appliance hoses for cracks or bulges, especially on your washing machine and dishwasher. Look under sinks for any signs of drips or moisture. Outside, make sure your gutters and downspouts are clear of debris. A quick visual inspection of your roof from the ground can also help you see if any shingles are missing or damaged, especially after a storm.
Stick to a Maintenance Routine
Consistency is key to prevention. Your regular inspections will likely reveal small tasks you need to handle, and it’s best to tackle them right away. Keeping your gutters clean is one of the most important jobs, as clogged gutters can cause water to overflow and seep into your roof and walls. It’s also a good idea to trim any tree branches hanging over your roof to prevent damage during high winds. Inside, test your sump pump if you have one, and consider having your HVAC system serviced annually to ensure it’s draining properly and not creating excess condensation.
Control Your Home’s Humidity
High humidity creates the perfect environment for mold to thrive, and in Florida, it’s a constant battle. After any water event, even a minor one, it’s crucial to dry the affected area completely. Mold can begin to grow within 24 to 48 hours, so time is of the essence. Using fans and a dehumidifier can help pull moisture out of the air and building materials. Aim to keep your home’s indoor humidity between 30% and 50%. Running your air conditioner helps, but a standalone dehumidifier can make a big difference, especially in bathrooms or basements.
Install Smart Water Detectors
For an extra layer of protection, consider placing smart water detectors in high-risk areas like near the water heater, under sinks, and behind the washing machine. These small devices can send an alert directly to your phone the second they detect moisture, giving you a critical head start to address the problem. It’s also essential that everyone in your household knows the location of your home’s main water shutoff valve. If a pipe bursts, being able to turn off the water immediately can drastically minimize the damage.
Related Articles
- Roof Leak Water Damage: A Complete Guide | SuperClean Restoration Services
- Emergency Water Extraction: A Complete Guide | SuperClean Restoration Services
- Water Damage Restoration Palm Beach FL | SuperClean Experts
Frequently Asked Questions
Can I just paint over a small water stain on my ceiling? That’s a tempting shortcut, but it’s one you should definitely avoid. Painting over a stain is like putting a bandage on a problem that needs stitches. It might look better for a little while, but the original leak is still there. The moisture will continue to seep in, causing the stain to reappear and leading to bigger issues like rotting wood, weakened drywall, and hidden mold growth. Always find and fix the source of the water before you even think about cosmetic repairs.
How can I tell if the water is from my roof or from my plumbing? A little detective work can help you narrow it down. If the water stain is on your top floor and seems to get worse when it rains, your roof is the most likely culprit. Check for damaged shingles or issues around chimneys and vents. If the stain is on a lower floor, especially underneath a bathroom or kitchen, there’s a good chance a leaky pipe or faulty appliance is to blame. Also, consider your AC unit if the damage is near your indoor air handler, as a clogged condensation line is a common issue here in Florida.
My ceiling is just a little discolored. How urgent is it to get it fixed? It’s best to treat any water stain with a sense of urgency, even if it seems small. That discoloration is proof that moisture has gotten into your ceiling materials and is likely trapped. What you can’t see is the potential damage happening behind the drywall. That trapped moisture can slowly weaken the structure and create the perfect environment for mold to grow, which can affect your home’s air quality. It’s always better to investigate a small issue before it becomes a major one.
What’s the absolute first thing I should do if I see my ceiling is actively dripping? Before you do anything else, focus on safety. Water and electricity are a dangerous mix, so your first move should be to go to your breaker box and shut off the power to that room. Once the electrical hazard is gone, place a bucket or waterproof bin under the drip to catch the water and protect your floors. Taking these two steps immediately helps contain the situation and keeps you safe while you figure out your next move.
How long do I have before mold starts to grow? Mold can begin to grow surprisingly fast. In the right conditions—which a damp, dark ceiling cavity certainly provides—mold can start to develop within just 24 to 48 hours of a water leak. This is why a quick response is so critical. Thoroughly drying the affected area as soon as possible is the best way to prevent mold from taking hold and protecting your family from the potential health issues it can cause.