When the Storm Clears, the Real Work Begins
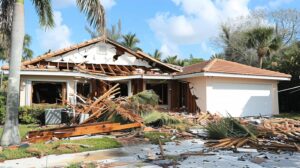
The hurricane has passed. You’ve emerged from shelter, checked on your loved ones, and taken your first tentative steps outside to survey the damage. Perhaps you’re looking at a missing section of roof, standing water in your living room, or debris scattered across your property. The overwhelming question now is: where do you even start with hurricane damage repair?
Here’s the truth that many homeowners learn too late: hurricane damage repair is not a simple matter of patching holes and cleaning up. The wind and water that battered your home created a complex web of visible and invisible damage. Rush into repairs without a proper assessment, and you risk trapping moisture that breeds mold, overlooking structural failures that threaten safety, or missing damage that could invalidate your insurance claim.
This comprehensive guide will walk you through the critical steps of hurricane damage repair—from the immediate aftermath through final restoration—ensuring your home is not just cosmetically repaired, but structurally sound, safe, and properly documented for maximum insurance recovery.
5 Critical Categories of Hurricane Damage That Require Professional Repair
Effective hurricane damage repair begins with understanding what you’re actually dealing with. The broken window is obvious. The compromised electrical system behind your walls is not.
1. Structural Damage: The Foundation of Safe Hurricane Damage Repair
High winds exert tremendous pressure on your home’s structure, while water infiltration compromises the very materials that hold everything together. Structural hurricane damage repair is non-negotiable for safety.
Critical structural issues that require professional repair:
- Foundation cracks and shifts caused by soil saturation and erosion, which can lead to catastrophic failure if not properly addressed with foundation repair techniques, not simple patching.
- Roof truss damage where hurricane-force winds have lifted, twisted, or cracked the framework that supports your roof, often invisible from ground level but critical for roof integrity.
- Load-bearing wall compromise including bowed walls, separation from the ceiling, or cracks near structural supports that indicate the wall can no longer safely bear its intended load.
- Framing damage where studs, joists, or rafters have been weakened by water exposure or physical impact, requiring sister jointing or complete replacement.
- Chimney instability where wind and water have loosened mortar or shifted the entire structure, creating a collapse hazard.
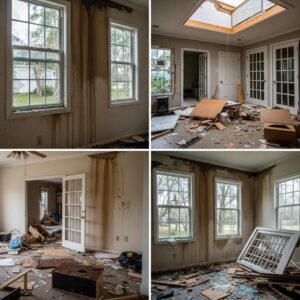
2. Water Damage and Mold: Time-Sensitive Hurricane Damage Repair
Water is hurricane damage’s most insidious element. It penetrates everywhere, and within 24-48 hours, mold begins its destructive colonization. Proper water damage repair requires immediate action and specialized equipment.
Water damage repair must address:
- Hidden water intrusion behind walls, under flooring, and in ceiling cavities where trapped moisture creates long-term structural decay and toxic mold growth that standard cleaning cannot eliminate.
- Saturated insulation which loses all R-value when wet and becomes a mold incubator, requiring complete removal and replacement, not attempted drying.
- Subfloor damage where water has compromised plywood or OSB subflooring, causing buckling, delamination, and rot that undermines your entire floor system.
- Drywall wicking where drywall has absorbed water from the bottom up, requiring cutting and replacement to at least 12-24 inches above the water line to prevent mold.
- HVAC system contamination where floodwater introduced bacteria, mold spores, and sewage into ductwork that will spread contaminants throughout your home every time you run the system.
3. Electrical System Repair: Life-Threatening Hurricane Damage
Water and electricity create deadly combinations. Electrical system hurricane damage repair requires licensed electricians, never DIY attempts, even if you have experience.
Electrical repairs that cannot be compromised:
- Submerged electrical panels which must be completely replaced, not dried out, as internal corrosion creates fire hazards that can manifest weeks or months later.
- Compromised wiring where insulation has been breached by water or physical damage, creating short circuits and fire risks that standard visual inspection cannot detect.
- Outlet and switch contamination where water has entered boxes and corroded connections, requiring replacement of the entire assembly, not just the visible components.
- Service entrance damage where the connection from the utility to your home has been compromised by fallen trees, wind, or water, requiring coordination with utility companies.
- Grounding system failure where the surge protection and safety grounding that prevents electrocution has been damaged by soil saturation or physical impact.
4. Plumbing and Gas Line Damage: Hidden Hurricane Repair Priorities
Ground shifting, freezing (in post-hurricane cold snaps), and direct impact can rupture pipes you can’t see. These repairs prevent health hazards and explosions.
Critical plumbing and gas repairs include:
- Sewer line damage where broken lines allow raw sewage to leak into your property or groundwater to enter your home’s plumbing, creating health emergencies and foul odors.
- Gas line leaks which pose immediate explosion and carbon monoxide risks, requiring immediate shutoff and professional repair with pressure testing before restoration.
- Supply line ruptures where freshwater pipes have frozen, shifted, or been impacted, causing water damage and potential contamination if debris enters the line.
- Septic system failure where drain fields have been flooded or tanks have shifted, requiring pumping, inspection, and potentially complete system replacement.
- Water heater damage where floodwater has damaged the tank, gas control valve, or electrical components, creating carbon monoxide or explosion risks that require full replacement.
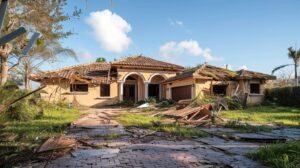
5. Roof and Exterior Envelope Repair: Your Home’s First Line of Defense
Your roof and exterior walls are your home’s weather barrier. Hurricane damage repair must restore this envelope completely or every interior repair is temporary.
Comprehensive exterior repairs must address:
- Roof decking damage where shingles may look intact but the underlying plywood has water damage, nail pull-through, or rot that will cause imminent failure.
- Flashing failure around chimneys, vents, and valleys where hurricane winds have lifted and twisted the metal that prevents water intrusion at vulnerable joints.
- Siding and cladding damage where wind has created breaches in your home’s weather barrier, allowing water and pest intrusion even if the damage appears minor.
- Window and door seal failure where pressure differentials and debris impact have compromised the weatherproofing that keeps water out during future storms.
- Gutter and drainage system damage which prevents proper water management and can direct water toward your foundation, undoing other repair work.
Can You DIY Hurricane Damage Repair? When to Call Professionals
After a hurricane, there’s intense pressure to start repairs immediately—insurance deadlines loom, temporary housing is expensive, and you want your life back to normal. The DIY impulse is strong, especially if you’re handy. But hurricane damage repair differs fundamentally from home improvement projects.
The Stark Reality: What’s at Stake
When DIY hurricane damage repair goes wrong:
The structural engineer’s report reveals that your wall repair actually covered up a load-bearing beam failure. Your insurance company denies your claim because you altered the damage before their adjuster could document it. The mold remediation that you thought you completed correctly has left spores in the HVAC system, triggering asthma in your children. The electrical work you felt confident about causes a house fire six months later.
These aren’t scare tactics—they’re common outcomes when homeowners tackle hurricane damage repair beyond their expertise.
Where DIY Makes Sense vs. Where Professionals Are Essential
Safe DIY hurricane damage repair tasks:
- Initial water extraction using wet/dry vacuums and fans to begin drying while awaiting professional assessment (but not demolition or repair decisions).
- Debris removal from your property and sorting salvageable items from total losses, with photo documentation at every stage.
- Temporary weatherproofing like tarping a damaged roof or boarding broken windows to prevent additional damage while awaiting repairs.
- Content cleaning and storage of undamaged belongings to clear space for professionals and prevent secondary damage.
- Documentation and communication including photographing all damage, tracking expenses, and coordinating with insurance and contractors.
Hurricane damage repair that requires licensed professionals:
- Structural repairs of any kind—load-bearing walls, foundation, roof framing, or floor joists—require engineers and contractors with specialty certifications.
- Electrical system restoration must be performed by licensed electricians and inspected by building officials; this is non-negotiable for safety and code compliance.
- Mold remediation beyond 10 square feet requires certified professionals with containment equipment, as improper handling spreads spores throughout your home.
- Gas line repair must be performed exclusively by licensed plumbers or gas fitters with proper leak detection and pressure testing equipment.
- Roof replacement requires specialized skills, safety equipment, and knowledge of hurricane-resistant installation techniques that exceed standard roofing practices.
The Professional Advantage: Why Expert Hurricane Damage Repair Protects Your Investment
Specialized equipment and technology that professionals bring includes thermal imaging cameras that detect hidden water intrusion, moisture meters that measure saturation deep in materials, structural load calculators, and commercial-grade drying equipment that achieves results in days that would take weeks with consumer equipment.
Training and certification means professionals understand building codes, recognize failure patterns invisible to homeowners, know which materials are salvageable versus unsalvageable, and can sequence repairs so that one doesn’t undermine another.
Insurance documentation created by professionals carries legal weight that your own assessment cannot match, includes detailed line-item breakdowns that prevent underpayment, and provides the technical language adjusters understand and respect.
Warranty and liability protection ensures that if repairs fail, you have recourse, whereas DIY repairs leave you bearing 100% of risk and cost if problems emerge later.
Time and stress reduction allows you to focus on your family’s needs and life recovery while experts handle the complex, technical work under tight timelines.
What to Expect During Professional Hurricane Damage Repair: The Complete Timeline
Understanding the hurricane damage repair process reduces anxiety and helps you plan for the disruption ahead. While every situation is unique, this timeline reflects typical professional restoration projects.
Phase 1: Emergency Stabilization (Days 1-3)
Before comprehensive repairs begin, professionals stabilize your home to prevent additional damage and make it safe for detailed assessment.
Emergency services include:
- Water extraction and initial drying using truck-mounted pumps and industrial dehumidifiers to stop the clock on mold growth and structural damage.
- Temporary weatherproofing with professional-grade tarps, board-up services, and emergency roof patches that withstand weather until permanent repairs.
- Hazard mitigation including temporary electrical service, gas line shutoff, and structural shoring where collapse risk exists.
- Content pack-out where severely damaged homes require removing and storing your belongings in climate-controlled facilities during major reconstruction.
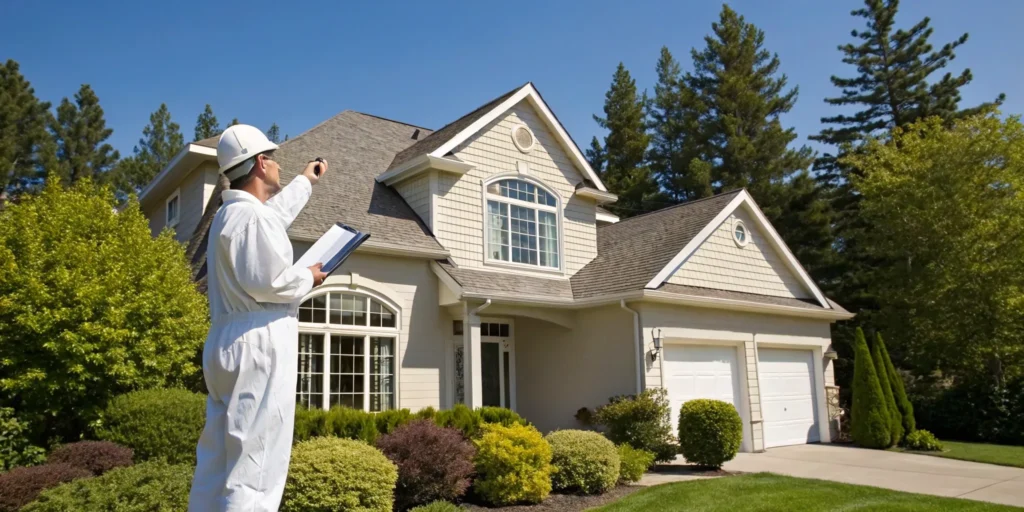
Phase 2: Comprehensive Assessment and Documentation (Days 3-7)
This critical phase determines the scope and cost of your hurricane damage repair. Rush this, and you’ll miss damage that becomes your financial burden later.
Professional assessment includes:
- Structural engineering inspection with written reports detailing every compromise, required repairs, and estimated costs formatted for insurance submission.
- Moisture mapping that identifies all areas requiring drying, demolition, or monitoring, ensuring no trapped water remains to cause future problems.
- Electrical system evaluation by licensed electricians who test every circuit, identify all compromised components, and provide code-compliant repair specifications.
- Plumbing and gas inspection with camera scopes, pressure tests, and tracer gas to locate hidden leaks and ensure system integrity.
- Environmental testing for mold, sewage contamination, or hazardous materials like asbestos that hurricane damage may have released.
You’ll receive:
A comprehensive repair estimate with line-item costs, recommended repair sequence, timeline projections, and all documentation needed for insurance claims and contractor bids.
Phase 3: Demolition and Remediation (Days 7-14)
Effective hurricane damage repair requires removing everything damaged beyond repair. This phase looks destructive but is essential for proper restoration.
Demolition addresses:
- Contaminated materials removal including all mold-affected drywall, insulation, flooring, and any porous materials exposed to floodwater or sewage.
- Damaged structural element exposure where walls and ceilings are opened to reveal and access damaged framing, wiring, and plumbing.
- Complete drying of all remaining structural elements to verified moisture content levels appropriate for each material type.
- Mold remediation with HEPA filtration, antimicrobial treatment, and containment barriers to prevent spreading contamination during removal.
Phase 4: Structural and Systems Repair (Weeks 2-6)
This is the heart of hurricane damage repair—rebuilding your home’s critical infrastructure to meet or exceed pre-storm condition.
Major repair work includes:
- Foundation and structural repairs using engineered solutions like helical piers, carbon fiber reinforcement, or concrete replacement based on damage severity.
- Framing reconstruction where damaged studs, joists, rafters, and trusses are replaced or reinforced using hurricane-resistant fastening and techniques.
- Roof system replacement from decking through shingles, incorporating modern hurricane straps, enhanced nailing patterns, and wind-resistant materials.
- Electrical system restoration with new panels, updated wiring to current code, GFCI protection, and whole-house surge suppression for hurricane-prone areas.
- Plumbing and gas system repair including re-piping, valve replacement, and upgrades to prevent future storm damage.
- HVAC system replacement or restoration with duct cleaning or replacement, new equipment if flooded, and properly sealed connections.
Phase 5: Finishing and Restoration (Weeks 6-10)
Once infrastructure is repaired, your home is rebuilt to its pre-storm condition (or better, depending on code requirements and insurance coverage).
Finishing work includes:
- Insulation and air sealing to restore energy efficiency and prevent moisture intrusion, using hurricane-resistant materials appropriate for your climate.
- Drywall installation and finishing with mold-resistant products in areas prone to moisture and proper taping, mudding, and sanding for seamless appearance.
- Interior and exterior painting using quality products that withstand humidity and protect against future water intrusion.
- Flooring installation with materials selected for your home’s risk profile, properly acclimated and installed to prevent future moisture problems.
- Trim and fixture installation restoring cabinets, countertops, door hardware, and all the details that make your house feel like home again.
- Final cleanup including HEPA vacuuming, duct cleaning, and deep cleaning to remove all construction debris and dust.
Phase 6: Inspection and Closeout (Week 10-12)
Professional hurricane damage repair concludes with verification that all work meets code and quality standards.
Closeout includes:
- Building inspector approvals for electrical, plumbing, structural, and general construction, ensuring everything is safe and legal.
- Final walkthrough where you verify all work is complete and meets your expectations before making final payment.
- Warranty documentation collecting all manufacturer warranties, contractor guarantees, and service records for future reference.
- Insurance claim finalization submitting all invoices, change orders, and documentation to close your claim and receive final payment.
Your Next Steps: The Hurricane Damage Repair Action Plan
You now understand the complexity of hurricane damage repair. Here’s your actionable plan to protect your safety, your home’s value, and your insurance recovery.
Immediate Actions (Within 24 Hours)
Your safety first checklist:
- Do not enter your home if there’s any risk of structural collapse, standing water with electrical power, or gas odor. Call professionals immediately.
- Document everything by taking comprehensive photos and videos of all damage from multiple angles before touching anything.
- Contact your insurance company to report the claim and ask about emergency repair coverage, advance payments, and required documentation.
- Stop additional damage with safe, temporary measures like tarping, boarding windows, or shutting off water, but don’t begin repairs.
- Secure your property to prevent theft or vandalism of damaged homes, which unfortunately increases after disasters.
Short-Term Actions (Within 1 Week)
Building your recovery team:
- Hire a certified inspector to conduct a comprehensive assessment before any repairs begin, creating documentation that protects your insurance claim.
- Interview restoration contractors asking for licenses, insurance, references, and experience with hurricane damage repair specifically, not just general contracting.
- Consider a public adjuster if damage is extensive or your insurance company disputes your claim, as they work for you, not the insurer.
- Get multiple estimates from licensed contractors for major work, ensuring they’re based on the inspector’s comprehensive report, not just visible damage.
- Establish a document system for all receipts, estimates, photos, correspondence, and contracts related to your hurricane damage repair.
Long-Term Actions (Weeks 2-12 and Beyond)
Managing your restoration project:
- Review all contracts carefully ensuring they specify the work scope, materials, timeline, payment schedule, and warranty details before signing.
- Monitor work regularly without micromanaging, maintaining open communication with your contractor about any discoveries or changes.
- Keep detailed financial records of all expenses, including temporary housing, which may be reimbursable under your insurance policy’s Loss of Use coverage.
- Understand the permitting process as most hurricane damage repair requires building permits, which protect you by ensuring code compliance and safety.
- Plan for the unexpected by maintaining an emergency fund for deductibles, cost overruns, or expenses insurance doesn’t cover.
Future Protection: Hurricane-Resistant Upgrades
Turn crisis into opportunity:
Many building codes now require that hurricane damage repair meets enhanced standards, not just restoration to pre-storm condition. Work with your contractor and insurance company to incorporate:
- Hurricane straps and clips that tie your roof structure to walls and foundation, dramatically reducing blow-off risk in future storms.
- Impact-resistant windows and doors that withstand flying debris and maintain your home’s envelope integrity during hurricanes.
- Reinforced garage doors which are often the weakest point in a home’s wind resistance and, when they fail, allow pressure to destroy the roof.
- Elevated utilities raising electrical panels, HVAC equipment, and water heaters above potential flood levels to prevent future damage.
- Improved drainage including French drains, grading improvements, and sump pumps to manage water away from your foundation.
- Whole-house surge protection to protect expensive electronics, appliances, and systems from power surges common after hurricanes.
Take Action Today: Your home’s recovery begins with the right first step. Schedule a certified inspection, document all damage thoroughly, and partner with licensed professionals who specialize in hurricane damage repair. Your family’s safety, your home’s value, and your financial recovery depend on getting this process right.
Frequently Asked Questions About Hurricane Damage Repair
How soon after a hurricane should I begin damage repair?
Timing is critical but sequence matters more than speed. Begin emergency stabilization (water extraction, tarping) within 24-48 hours to prevent mold and additional damage. However, do not begin permanent repairs until you’ve completed professional inspection and received insurance approval. Starting repairs prematurely can invalidate your claim if you alter or dispose of damage before the adjuster documents it. The ideal sequence: stabilize immediately, document thoroughly, get professional assessment, secure insurance approval, then begin comprehensive repairs.
Is hurricane damage repair different from standard home renovation?
Yes, fundamentally different in scope, standards, and stakes. Hurricane damage repair must address hidden damage like trapped moisture, structural compromise, and contamination that renovation doesn’t encounter. It requires working with insurance companies, meeting specific documentation requirements, and often complying with enhanced building codes that exceed pre-storm standards. Repairs must be sequenced carefully—drying before enclosing, remediating before finishing—whereas renovation offers more flexibility. Additionally, hurricane damage repair often occurs under emotional stress, tight timelines, and with the added complexity of insurance negotiations that standard renovation avoids.
Will my insurance cover the full cost of hurricane damage repair?
Coverage depends on your policy, damage cause, and documentation quality. Standard homeowners insurance covers wind damage but often excludes flood damage, which requires separate flood insurance. Your policy’s coverage limits, deductibles, depreciation factors, and specific exclusions all affect your payout. This is why professional documentation is critical—a comprehensive inspection report with detailed photos and estimates gives you leverage to negotiate fair settlements. If your insurance company disputes your claim or offers inadequate settlements, consider hiring a public adjuster or attorney who specializes in property claims to advocate for full coverage of legitimate hurricane damage repair costs.
Can I choose my own contractor for hurricane damage repair?
Yes, and you should be cautious of contractors your insurance company recommends. While insurers may suggest “preferred” contractors, you have the legal right to hire any licensed, insured contractor you choose. Many homeowners have better experiences with contractors they vet independently rather than those on insurance company lists, who may prioritize the insurer’s cost concerns over quality. Get multiple estimates, check licenses and insurance, read reviews, ask for references from recent hurricane repairs, and ensure they’re local or regional companies with accountability, not out-of-state storm chasers who disappear after payment.
My insurance adjuster already inspected. Do I still need a separate inspection for hurricane damage repair?
Absolutely yes—critical for protecting your interests. Insurance adjusters work for the insurance company, not for you. Their goal is to assess damage for claim purposes, often minimizing costs. A certified home inspector or structural engineer works for you, identifying all damage including what’s hidden behind walls or in attics. Independent inspections frequently uncover damage adjusters miss or downplay, providing documentation you can use to negotiate better settlements. The inspection cost (typically $400-$800) is minimal compared to the thousands or tens of thousands in additional coverage it often secures. Consider it essential insurance for your insurance claim.
How long does complete hurricane damage repair typically take?
Timeline varies dramatically based on damage severity and contractor availability. Minor repairs (roof patch, window replacement, cosmetic fixes) may complete in 2-4 weeks. Moderate damage with water intrusion, mold, and multiple systems affected typically requires 2-3 months. Severe damage involving structural repairs, complete gut-and-rebuild, or foundation work can take 6-12 months. Post-hurricane, timelines extend further due to contractor shortages, material availability, and inspection delays. Plan for longer than estimated, maintain patience, and don’t sacrifice quality for speed. Rushing hurricane damage repair to meet arbitrary deadlines virtually guarantees problems that will cost more to fix later than the time saved was worth.
What if I can’t afford my deductible or the repairs my insurance won’t cover?
Several options exist, though all require careful consideration. Many contractors offer financing programs specifically for disaster recovery, though interest rates vary significantly. Some insurance companies allow deductible payment plans. Disaster assistance programs from FEMA or SBA offer low-interest loans for uninsured or underinsured losses, though they require applications and qualification. Local nonprofits sometimes provide grants for essential repairs, particularly for vulnerable populations. Consider phasing repairs, addressing critical issues (structure, safety systems) immediately and deferring cosmetic work. Consult with your contractor about cost-saving material alternatives that don’t compromise quality. Whatever you decide, never skip essential structural or safety repairs—these only become more expensive and dangerous over time.
Should I repair or rebuild after major hurricane damage?
Complex decision requiring professional guidance and financial analysis. If repair costs exceed 50% of your home’s value, rebuilding often makes more financial sense, especially if damage is extensive or your home had pre-existing issues. Modern building codes may require substantial upgrades during repair that make new construction comparable in cost but superior in value. Consider your home’s age, condition before the storm, neighborhood recovery trajectory, and emotional attachment. Meet with contractors, engineers, and insurance representatives to compare true costs. Sometimes insurance policies have different coverage limits for repair versus rebuilding. A financial advisor or attorney specializing in disaster recovery can help you analyze which option optimizes your long-term financial position and quality of life.
Hurricane damage repair is not a project any homeowner hopes to face, but with the right knowledge, professional partners, and systematic approach, you can emerge with a home that’s not just restored, but stronger and more resilient than before the storm.
Take that crucial first step today—your family’s safety and your home’s future depend on getting this right. Contact SuperClean Restoration Services at 844-888-0837 or email Info@supercleanrestorationpb.com for expert guidance through every step of your recovery journey.