A flooded basement can feel like a dozen problems hitting you all at once. From shutting off the power and calling your insurance agent to figuring out what’s salvageable, it’s hard to know where to even begin. Acting quickly is important, but acting correctly is what truly matters. We’ve created this comprehensive guide to serve as your calm, clear-headed plan in a chaotic situation. We will walk you through everything you need to know for a successful basement flood cleanup, covering the immediate actions you must take, the step-by-step cleaning process, and the final restoration checks to ensure your space is safe and dry.
Key Takeaways
- Act Safely, Not Hastily: Before you rush in, your first move must be to turn off the power at the breaker box. Always assume floodwater is contaminated and protect yourself with waterproof boots, gloves, and a mask before starting any cleanup.
- Speed Is Key to Recovery: The clock on mold growth starts ticking immediately, with spores often appearing in just 24-48 hours. After you’ve documented all the damage for your insurance claim, focus on removing water and drying the area as quickly as possible.
- Shift from Cleanup to Prevention: Once your basement is restored, focus on keeping it that way. Simple maintenance like cleaning your gutters, ensuring your yard slopes away from the house, and installing a sump pump are the most effective ways to prevent future floods.
Why Do Basements Flood?
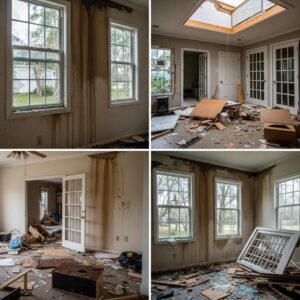
Discovering water in your basement is a sinking feeling, and not just because of the moisture. It’s a common problem for homeowners, but the cause isn’t always a dramatic storm. Water is persistent and will find any path it can into your home. Understanding where it’s coming from is the first step to fixing the problem and preventing it from happening again. From heavy Florida rains to a simple plumbing failure, the culprits can be both outside and inside your house. Let’s walk through the most common reasons your basement might be taking on water.
Common Natural Causes
Here in Palm Beach County, we’re no strangers to heavy rain. When the ground becomes completely saturated, it can’t absorb any more water. This creates something called hydrostatic pressure, which is just a technical way of saying the water-logged soil pushes against your foundation. If it finds a weak spot, it will force its way inside. During a major storm, municipal drainage systems can also get overwhelmed, causing water to back up and seek lower ground—which is often your basement. Clogged gutters can also be a problem, directing sheets of rain right down to your foundation instead of safely away from the house.
Structural and Foundation Issues
Your home’s foundation is its primary defense against groundwater, but it’s not always impenetrable. Over time, concrete can develop cracks in the walls or floor. Even a hairline fracture is an open invitation for moisture to seep through. Water always follows the path of least resistance, and these small openings are exactly what it’s looking for. Poor sealing around pipes or windows can also create entry points. If the original basement waterproofing was done improperly or has degraded over the years, your basement becomes much more vulnerable to leaks during even moderate rainfall.
Everyday Plumbing Failures
Sometimes, the call is coming from inside the house. Your home’s plumbing system is a network of pipes and appliances that can fail without warning. A burst pipe, a leaking water heater, or a washing machine hose that gives way can release a surprising amount of water in a very short time. Another common and unpleasant cause is a sewage backup, where a clog in your home’s drain pipes or the main sewer line forces wastewater back into your basement. These internal failures can happen at any time, rain or shine, making them particularly unexpected.
Know the Warning Signs
Catching a water problem early can save you a lot of headaches and expense. Keep an eye out for subtle clues like damp spots appearing on walls or floors, a persistent musty odor you can’t seem to place, or paint that’s starting to peel or bubble. You might also notice efflorescence, a white, chalky substance on concrete walls left behind by evaporating water. If you spot any of these signs, it’s a clear signal that moisture is getting in. Acting quickly is key. If you’re facing standing water or suspect a serious leak, it’s time to call for professional water damage restoration to safely handle the situation.
Your Safety Checklist Before You Begin
When you discover a flooded basement, your first instinct might be to jump right in and start cleaning. But before you take a single step into the water, it’s crucial to pause and prioritize your safety. Floodwater can hide serious dangers, from electrical shock to harmful contaminants. Running through this safety checklist first will protect you and your family, ensuring the cleanup process is as safe as it is effective. Taking these precautions will set you up for a successful restoration without putting your health on the line.
Address Electrical Hazards
Water and electricity are a dangerous combination. Before you even think about entering the flooded area, your absolute first step is to shut off the power to your basement. You can usually do this at your home’s main circuit breaker panel. If the panel is located in the flooded basement or if you have to stand in water to reach it, do not attempt to turn it off yourself. In that situation, it’s time to call a licensed electrician immediately. Never take a risk when it comes to electrical hazards; your safety is not worth it.
Gear Up: Essential Protective Equipment
Think of this as your cleanup uniform—it’s non-negotiable for protecting yourself. You’ll need some basic personal protective equipment (PPE) before you start. At a minimum, grab a pair of sturdy, waterproof boots and rubber gloves to keep contaminated water off your skin. It’s also smart to wear long sleeves and pants. If you see or suspect mold growth, you’ll need to add eye protection like goggles and a high-quality face mask, such as an N95 or N100 respirator, to prevent breathing in harmful spores. Gearing up properly is a simple step that makes a huge difference.
Understand Water Contamination Levels
It’s easy to think of floodwater as just… water. But the reality is often much dirtier and more dangerous. Floodwater can be contaminated with a nasty mix of things you definitely don’t want to touch, including sewage, chemicals, bacteria, and other pollutants. The U.S. Environmental Protection Agency warns that these contaminants can pose significant health risks. This is why wearing protective gear is so important. Treating all floodwater as if it’s contaminated is the safest approach you can take to protect your health during the cleanup process.
Protect Your Health from Potential Risks
Beyond the immediate dangers of the water itself, the lingering moisture creates a perfect environment for mold. It can begin to grow on damp surfaces like drywall, wood, and carpet in as little as 24 to 48 hours. Breathing in mold spores can cause a range of health issues, from allergic reactions and asthma attacks to more serious respiratory problems. This is one of the biggest reasons why a fast and thorough drying process is so critical. If the flooding was extensive or if items have been wet for more than a day or two, the risk of widespread mold growth increases significantly.
What to Do Immediately After a Flood
Discovering a flood in your basement is overwhelming, but your first few actions are critical. Acting quickly and safely can make a huge difference in the extent of the damage and the smoothness of your recovery process. Focus on these four immediate steps to get the situation under control before you begin the larger cleanup. This initial response sets the stage for a successful restoration and helps protect both your property and your health.
Secure the Area Safely
Before you even think about cleanup, your first priority is safety. Floodwater is often much more dangerous than it looks. It can be contaminated with everything from sewage and bacteria to chemicals and other pollutants, posing serious health risks. Before entering the flooded area, make sure the electricity is turned off at the breaker box to prevent electrocution. Put on protective gear, including waterproof boots and gloves. If the water is deep, you smell gas, or see structural damage, stay out and call for professional help immediately. Your well-being is the most important thing, and no possession is worth risking it.
Document Everything for Your Insurance Claim
Once the area is safe to enter, your next call should be to your insurance company. But before you move a single item, pull out your phone and start documenting everything. Take extensive photos and videos of the entire flooded area, capturing the high-water marks on the walls and the damage to your property and belongings. This visual evidence is crucial for your insurance claim. Create a detailed list of all damaged items, noting their approximate value and age if possible. The more thorough your documentation, the easier it will be to process your claim and get the compensation you need for repairs and replacements.
Start Removing Water
If the flooding is minor—just an inch or two of water—and you’ve confirmed there are no electrical hazards, you can begin removing the water yourself. A wet/dry vacuum is a great tool for smaller jobs. For slightly more water, a sump pump can help move it out of the basement quickly. However, if you’re dealing with several inches of water or more, it’s time to call in the professionals. Large-scale water damage restoration requires specialized equipment to be done safely and efficiently. Attempting a major cleanup on your own can be dangerous and may lead to incomplete drying, setting the stage for mold.
Salvage Your Valuables
With the water gone, it’s time to sort through your belongings. This can be an emotional process, so try to be methodical. You’ll need to decide what to keep and what to throw away. Unfortunately, porous items that have absorbed contaminated floodwater—like carpets, upholstered furniture, mattresses, and books—are usually impossible to salvage and should be discarded. Hard, non-porous items like plastic, metal, and glass can often be saved. These items need to be thoroughly cleaned and disinfected to ensure they are safe to bring back into your home. When in doubt, it’s always safer to err on the side of caution and dispose of an item.
DIY vs. Calling a Pro: How to Decide
When your basement is underwater, your first instinct might be to roll up your sleeves and tackle the mess yourself. While that can-do attitude is great, a flooded basement presents unique challenges and serious risks. Deciding whether to handle the cleanup on your own or call in a professional team is a critical first step. This isn’t just about saving time or money; it’s about ensuring your home is safe, clean, and structurally sound for the long haul.
Making the right call depends on the scale of the damage, the type of water you’re dealing with, and your comfort level with the risks involved. Let’s walk through the key factors to help you determine the best path forward for your home and family.
How to Assess the Damage
Before you even think about cleanup, you need to safely assess the situation. The first thing to consider is the amount of water. If you’re looking at more than a couple of inches of standing water, the job may already be too big for standard household tools. Professional crews have powerful pumps and vacuums designed for rapid water extraction.
The most immediate danger, however, is electrical. If the water level is high enough to reach outlets, electrical panels, or submerged appliances, do not enter the area. If you can’t safely get to your breaker box to shut off the power, you should stop right there and call for professional help. Your safety is the top priority, and it’s never worth the risk of electrocution.
Telltale Signs You Need an Expert
Some situations are clear-cut signs that you need to bring in the pros. A major red flag is the water source. If the flooding came from a sewer backup or overland flooding from a storm, that water is highly contaminated. It can be filled with harmful bacteria and chemicals that pose serious health risks. This is not something you want to handle without proper protective gear and sanitizing agents.
Another sign is when the water has had time to soak into your home’s structure. If drywall, insulation, or wooden supports are saturated, you’ll need industrial-grade dehumidifiers and air movers to prevent mold growth and structural damage. Since flooding can happen at any time, a professional 24/7 emergency response is often necessary to mitigate damage quickly and effectively.
Understand the Costs
It’s no secret that hiring a professional restoration service is an expense, and it’s often the main reason homeowners hesitate. On average, a professional basement cleanup can cost between $2,000 and $7,000, depending on the size of the area and the extent of the damage. Most companies charge by the square foot, which typically covers water removal, drying, and initial sanitization.
While that number might seem high, it’s important to weigh it against the potential costs of a DIY job gone wrong. If moisture isn’t completely removed, you could face a much more expensive mold remediation project down the road. Not to mention the cost of replacing warped flooring or rotted structural beams. Paying for professional service is an investment in getting the job done right the first time.
What Your Insurance Might Cover
Navigating your insurance policy can feel overwhelming, but it’s a crucial step. It’s important to understand that standard homeowner’s insurance policies treat different types of water damage differently. Generally, if the flooding is from an internal source—like a burst pipe or a faulty appliance—you are likely covered.
However, damage from natural disasters like hurricanes or rising rivers typically requires a separate flood insurance policy. As soon as it’s safe to do so, call your insurance agent. They can clarify your coverage, explain the claims process, and advise you on next steps. Documenting everything with photos and videos before you move anything will be a huge help for your claim.
Your Step-by-Step DIY Cleanup Guide
If you’re facing a minor flood and feel confident you can handle the cleanup yourself, this guide will walk you through the process. Remember, your safety is the top priority. Floodwater can be surprisingly hazardous, often containing bacteria and chemicals you don’t want to mess with. Before you start, make sure the power is off in the flooded area and you’re wearing the right protective gear. If the water is more than a few inches deep or you suspect it’s contaminated with sewage, it’s always best to call in professionals. For smaller, manageable situations, here’s how you can tackle the cleanup and start getting your space back to normal.
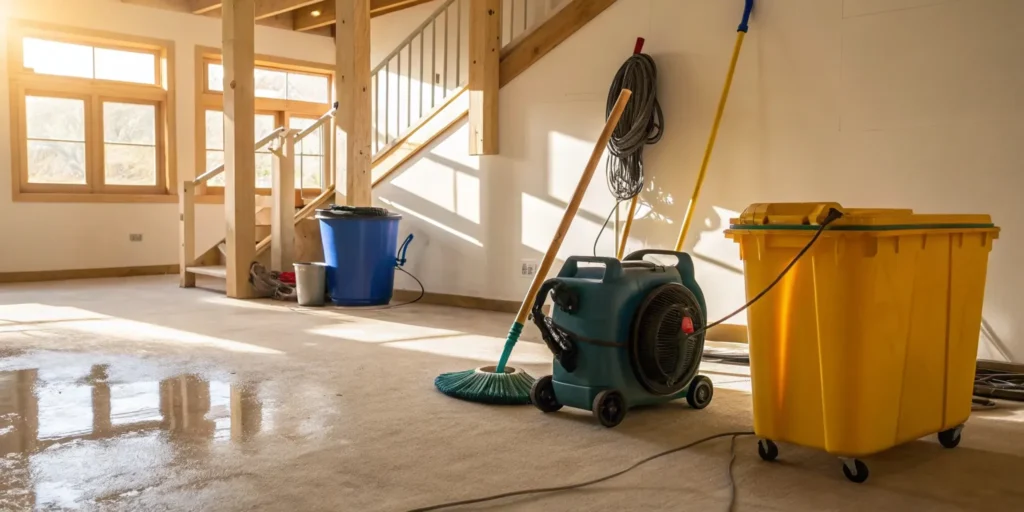
Gather Your Tools and Supplies
First things first, let’s get your gear in order. You can’t safely clean a flood without the right equipment. You’ll need waterproof boots, gloves, and safety glasses or goggles to protect yourself from contaminated water. A wet/dry vacuum or a sump pump is essential for removing the water itself. Also, grab some buckets, mops, and old towels. For the drying phase, you’ll want several large fans and a dehumidifier. Finally, have cleaning supplies like a non-ammonia detergent and disinfectants on hand. Having everything ready before you begin will make the entire process smoother and safer.
Step 1: Remove All Standing Water
Once you’re geared up, it’s time to get the water out. The fastest way to do this is with a sump pump or a heavy-duty wet/dry vacuum. Work methodically to remove all the standing water from the basement floor. If you’re using a wet/dry vac, you’ll need to empty the canister frequently, so have a safe place to dispose of the water, like a sanitary sewer drain. After the puddles are gone, use mops and towels to soak up any remaining water. The goal is to get the area as dry as possible before moving on to the next steps.
Step 2: Sort and Clear Damaged Items
Now comes the tough part: sorting through your belongings. You’ll need to move everything out of the flooded area to let it dry properly. Be prepared to make some hard decisions about what to keep and what to throw away. Porous items like carpets, upholstered furniture, mattresses, and drywall that have been soaked are often impossible to salvage and can become a breeding ground for mold. The EPA’s guide to flood cleanup recommends removing and discarding any materials that can’t be cleaned and dried quickly. Take photos of everything for your insurance claim before you dispose of it.
Step 3: Dry and Dehumidify Everything
Getting your basement completely dry is crucial for preventing mold growth. Open up any windows and doors to get air circulating. Set up large fans—ideally industrial-grade ones you can rent—to blow air across the floors and walls. A powerful dehumidifier is your best friend here; run it continuously to pull moisture out of the air and from materials like wood and concrete. This drying process isn’t quick—it can take several days to get everything thoroughly dry. Be patient, as this step is one of the most important for a successful restoration.
Step 4: Sanitize and Disinfect
After everything is dry, it’s time to clean and sanitize all surfaces that came into contact with floodwater. Start by washing down walls, floors, and any non-porous items you salvaged with hot water and a heavy-duty cleaner or detergent. This will remove the dirt and grime left behind by the flood. Once cleaned, you’ll need to disinfect these surfaces to kill any lingering bacteria or mold spores. A solution of one cup of household bleach to one gallon of water is an effective disinfectant for hard surfaces. Never mix bleach with ammonia-based cleaners, as this creates toxic fumes.
Step 5: Prevent Future Mold Growth
Mold can begin to grow within 24 to 48 hours of a flood, so acting fast is key. Even after you’ve cleaned and dried the area, you need to remain vigilant. Keep the dehumidifier running for a few more days and monitor the humidity levels, aiming to keep them below 50%. Check for any musty odors or visible signs of mold in the weeks following the cleanup. For long-term prevention, consider installing a permanent sump pump with a battery backup and ensuring your gutters and downspouts are directing water far away from your foundation.
Stay Safe During the Cleanup Process
Once you’ve handled the immediate shock of a basement flood, your focus will shift to cleanup. But before you roll up your sleeves, it’s crucial to understand that this isn’t like a typical cleaning job. Your safety, and the safety of your family, must come first. Floodwater isn’t just water; it can be a hazardous mix of contaminants, and the damp environment is a perfect breeding ground for mold.
Tackling the cleanup means protecting yourself from these hidden dangers. This involves understanding what’s in the water, wearing the right personal protective equipment (PPE), ensuring the air you’re breathing is safe, and properly disposing of damaged items. Skipping any of these steps can expose you to health risks that can cause problems long after the water is gone. Think of this as your non-negotiable safety protocol. Following these guidelines will help you manage the cleanup efficiently while keeping yourself out of harm’s way. The process can be physically and emotionally draining, and it’s easy to cut corners when you’re tired. But these safety measures are what separate a successful restoration from a future health hazard. If at any point the situation feels too overwhelming or dangerous, remember that our 24/7 emergency team is always here to help.
Know the Types of Contaminated Water
It’s easy to assume all floodwater is the same, but the source of the water determines its contamination level and the risk it poses. According to the EPA, floodwater can contain a nasty mix of harmful bacteria and chemicals that can seriously affect your health.
Professionals generally classify water into three categories: clean, gray, and black. Clean water comes from a broken supply line, gray water is from sources like washing machines, and black water is highly contaminated, often from sewage backups or overland flooding. After a storm or major leak, it’s safest to treat all floodwater in your basement as black water, because you never know what it has picked up along the way.
Wear the Right Protective Gear
Never enter a flooded area without the proper Personal Protective Equipment (PPE). This isn’t the time for shorts and flip-flops. Your goal is to create a barrier between your body and the contaminated environment.
At a minimum, you should wear an N-95 respirator mask to protect your lungs from inhaling mold spores and other airborne particles. You’ll also need non-vented goggles to shield your eyes from splashes, heavy-duty gloves to protect your hands, and a long-sleeved shirt and long pants. Finish your outfit with waterproof, steel-toed boots to guard against sharp, submerged debris. This gear is your first line of defense against injury and illness.
Keep the Air Clean and Safe
What you can’t see can often be the most dangerous. A damp, flooded basement is the ideal environment for mold, which can begin to grow on wet surfaces like drywall and wood in as little as 24 hours. Breathing in mold spores can trigger allergic reactions, asthma attacks, and other respiratory issues.
To improve air quality, ventilate the space as much as possible by opening any windows and doors. Use fans to help circulate air and speed up the drying process, but only if you are certain the electrical system is safe to use. For significant flooding, household fans won’t be enough. Professional-grade air movers and dehumidifiers are essential for properly drying out the space and keeping the air safe to breathe.
How to Safely Dispose of Debris
One of the most difficult parts of flood cleanup is deciding what to keep and what to throw away. The rule of thumb is simple: materials that soaked up a lot of water and cannot be thoroughly cleaned and dried must go.
This unfortunately includes most porous items like carpets and padding, upholstered furniture, mattresses, drywall, and insulation. These materials act like sponges, trapping contaminants and making complete sanitization nearly impossible. Before you start hauling things out, check your local regulations for disposing of flood-damaged materials. Be sure to seal unsalvageable items in heavy-duty plastic bags to prevent the spread of contaminants.
How to Prevent Future Basement Floods
After you’ve put in all the hard work of cleaning up a flooded basement, the last thing you want is to go through it all again. Taking proactive steps now can save you a massive headache and a lot of money down the road. Preventing a flood is always easier and cheaper than cleaning one up. The good news is that many preventative measures are straightforward and can be part of a simple home maintenance routine. From checking your property’s drainage to installing some smart tech, you have the power to protect your home. Let’s walk through the most effective strategies to keep your basement dry and secure, so you can have peace of mind, especially when those Florida storm clouds roll in.
Follow a Regular Maintenance Checklist
Think of this as a regular health check-up for your home. A few minutes of prevention can make a huge difference. At least twice a year, walk around your foundation and look for any new cracks or gaps, sealing them as you find them. Clean your gutters and downspouts to ensure rainwater flows freely away from your house. Inside, take a look at your water heater and pipes for any signs of leaks or corrosion. If you notice that your basement gets damp or floods even after small storms, it’s a clear sign of a bigger issue. That’s when it’s time to get a professional waterproofing inspection to pinpoint the source of the problem.
Explore Waterproofing Solutions
If your home is prone to water issues, it’s time to bring in some heavy-duty help. A sump pump is one of the best defenses against basement flooding. It sits in a pit in the lowest part of your basement and automatically pumps out water that collects there. Since storms in Palm Beach County can often knock out the power, investing in a battery-powered backup is a must. Another powerful tool is an interior drainage system, which collects water that seeps through the foundation walls and funnels it to the sump pump. These systems work together to create a reliable waterproofing solution that keeps your basement dry.
Improve Your Property’s Drainage
How water behaves around your house is just as important as what’s happening inside it. Your goal is to direct all water away from your foundation. Take a look at the ground surrounding your home—it should gently slope away from the walls. If it doesn’t, you may need to add soil to regrade the landscape. Also, check that your downspouts extend at least six feet from your foundation. When the soil next to your home becomes overly saturated, it creates hydrostatic pressure, which can force water directly through tiny cracks in your basement walls. Proper drainage is your first line of defense against this.
Install Water Alarms and Detectors
For an extra layer of security, water alarms are a simple and affordable solution. These small, battery-operated devices can be placed in flood-prone areas of your basement, like near the water heater, washing machine, or sump pump. The moment they detect moisture, they sound a loud alarm, giving you a critical head start to address a leak before it turns into a full-blown flood. Some newer models are even “smart” and can send an alert directly to your phone if you’re away from home. Think of it as a smoke detector for water—an essential early warning system that provides invaluable peace of mind.
The Final Steps: Recovery and Restoration
Once the water is gone and the area is clean, you’re in the home stretch. But before you start rebuilding, a few final checks are essential to ensure your basement is truly safe and restored for the long haul. This last phase is all about confirming the structural integrity of your home, making sure every last bit of moisture is gone, and replacing materials that could cause problems later. Rushing this part can lead to serious issues like mold and structural weakness. Taking the time to complete these recovery steps gives you peace of mind that the job is done right.
Check for Structural Damage
Flooding can put immense pressure on your home’s structure, causing damage that isn’t always obvious. Water can weaken foundations, warp support beams, and compromise walls and flooring. Before you even think about rebuilding, do a thorough visual inspection. Look for new cracks in the foundation, sagging ceilings, or warped walls. If you notice anything that seems off, it’s crucial to consult with a professional for a proper assessment. A structural engineer or a restoration expert can identify hidden dangers and ensure your home is safe before you proceed with any repairs. Your family’s safety is the top priority.
Rebuild and Replace Damaged Materials
Now it’s time to be ruthless. Any porous materials that were soaked by floodwater need to go. This includes drywall, insulation, carpeting, and particleboard furniture. These items act like sponges, trapping moisture and creating the perfect environment for mold to grow, sometimes within just 24-48 hours. Even if they look dry on the surface, they are likely still damp inside. It’s always safer to remove wet furniture and materials and replace them with new, clean ones. This step is non-negotiable for preventing future mold infestations and protecting your home’s air quality.
Perform a Final Moisture Test
Your eyes and hands can be deceiving when it comes to moisture. To be absolutely certain your basement is dry enough for rebuilding, you need to test it. You can get a moisture meter at most hardware stores. Use it to test wood studs, concrete floors, and any other materials that were affected by the flood. According to the EPA, materials are considered safely dry when they have a moisture content of 15% or less. Don’t start putting up new drywall or laying new flooring until you hit this number. This final flood cleanup check ensures you aren’t sealing moisture inside your walls, which would defeat all your hard work.
Complete Your Final Safety Checks
Before you officially declare the cleanup complete, run through a few final safety checks. If your furnace, water heater, or HVAC system was touched by floodwater, do not turn it on. These systems can harbor mold and spread contaminants throughout your home if not properly cleaned. You must have a professional clean and inspect them first. It’s also a smart idea to have a licensed electrician check any outlets, wiring, or electrical panels that were submerged to prevent fire hazards. Taking these final precautions ensures your restored basement is not only clean but also completely safe for your family to enjoy.
Related Articles
- Flood Restoration Guide: Steps to Recover From Water Damage | SuperClean Restoration Services
- Flood Restoration Guide: Steps, Costs & Timelines | SuperClean Restoration Services
- Emergency Water Extraction: A Complete Guide | SuperClean Restoration Services
Frequently Asked Questions
How quickly does mold start to grow after a basement flood? Mold can begin to grow in as little as 24 to 48 hours after a flood. The damp, dark environment of a basement combined with materials like drywall, wood, and carpet creates the perfect conditions for it to thrive. This is why acting fast is so critical. The longer materials stay wet, the higher the chance of a widespread mold problem that can affect your home’s air quality and your family’s health.
The water only reached a small area. Do I still need to worry about turning off the electricity? Yes, absolutely. Your safety is the top priority, and you should always treat water and electricity as a dangerous combination. Even if the standing water seems contained, moisture can seep into walls and flooring, potentially reaching hidden wiring or outlets. Before you step into any wet area, no matter how small, shut off the power at the main breaker. If you have any doubt about how to do this safely, call a licensed electrician.
The floodwater in my basement has already receded. Am I in the clear? Not quite. Even after the standing water is gone, the real problem is the moisture that gets left behind. Porous materials like concrete, drywall, and wood studs can hold onto water for a long time, creating a hidden breeding ground for mold and mildew. The water may have also left behind contaminants you can’t see. A thorough drying and sanitizing process is still necessary to ensure your basement is truly safe and prevent long-term damage.
Will my homeowner’s insurance policy cover the cost of professional water damage restoration? It really depends on the source of the water. Standard homeowner’s insurance policies often cover damage from internal sources, like a burst pipe or a malfunctioning appliance. However, they typically do not cover flooding caused by natural disasters, such as a hurricane or overflowing river. For that, you would need a separate flood insurance policy. The best first step is to call your insurance agent as soon as possible to clarify your specific coverage.
What is the single most effective thing I can do to prevent this from happening again? If you do just one thing, focus on managing the water around your home’s exterior. Make sure your gutters are clean and your downspouts direct water at least six feet away from your foundation. Also, check that the ground around your house slopes gently away from the walls. Preventing water from pooling against your foundation is your best defense against it finding a way inside. For an added layer of protection, a sump pump with a battery backup is an excellent investment.